Semanticality™ – Semantic & Accessibility Tool for WordPress
Information about the article

Author: Dmitry Dugarev
Semanticality™ is a tool designed to enhance the semantics and accessibility of WordPress sites using the Gutenberg editor, without requiring you to delve into code. It operates on top of the existing HTML generated by blocks, allowing for flexible customization of tags and attributes directly from the editor interface.
It addresses three main challenges:
- Simplifying Semantic Edits: Change tags, attributes, and ARIA without custom code.
- Flexible Management: Local rules for individual pages + global rules for the entire site.
- Accessibility Support: Helps achieve WCAG compliance and improves UX for screen readers.
In short: you write rules → view Live Preview → test with a screen reader → publish.
The core idea is simple: every block in WordPress has an HTML output. Sometimes, this output doesn't meet semantic, accessibility, or SEO standards. With Semanticality™, you can "rewrite" this output during the page rendering stage: replace <div> with <section>, add aria-* attributes, insert unique identifiers, or modify the structure without touching the original theme or plugin code.
Sometimes, visual changes are imperceptible, but for screen readers, they are critical.
<!-- Before -->
<div class="kt-accordion-header-wrap">
  <div class="kt-accordion-title">FAQ</div>
</div>

<!-- After -->
<section aria-labelledby="faq-title">
  <h2
    id="faq-title"
    class="kt-accordion-title"
    aria-label="FAQ – Frequently Asked Questions"
  >
    FAQ
  </h2>
</section>
Such a simple edit:
- provides the correct heading structure (WCAG 2.2 SC 2.4.6 Headings and Labels),
- improves navigation for screen reader users (WCAG 2.2 SC 2.4.1 Bypass Blocks),
- allows the screen reader to announce the block as a "level two heading" (WCAG 2.2 SC 1.3.1 Info and Relationships),
- improves SEO (Google loves structured headings).
Important: When working with the plugin, it is recommended to use a staging or local version of your website and never apply changes to a live site without prior testing. Some HTML elements have standard styles, and changes might affect the website's appearance or break some JavaScript scripts.
Performance and Load
Semanticality™ operates quickly, but here's what to consider:
- Rules are applied during frontend rendering, meaning very complex or unnecessary selectors can slow down rendering.
- The more rules in Global, the higher the load. Solution: optimize and merge them.
- If the site has tens of thousands of pages:
- test on staging first,
- configure page caching,
- use the plugin only for what truly improves accessibility.
Compatibility and Limitations
Semanticality™ is compatible with most themes and plugins, but there are nuances:
- Works only with Gutenberg / WordPress block editor.
- Does not support: Elementor, Divi, and other visual builders.
- Works with block themes and classic themes. Even when the block editor is disabled for a post type, Site/Page rules can still target classic markup such as
h1.entry-titleas long as blocks are used somewhere on the site. - Works with multisites, but global rules are stored separately for each network. Each site instance must have its own license.
- Supports Reusable Blocks and Patterns, but check Live Preview, as selectors within such blocks can be unstable.
Quick Start
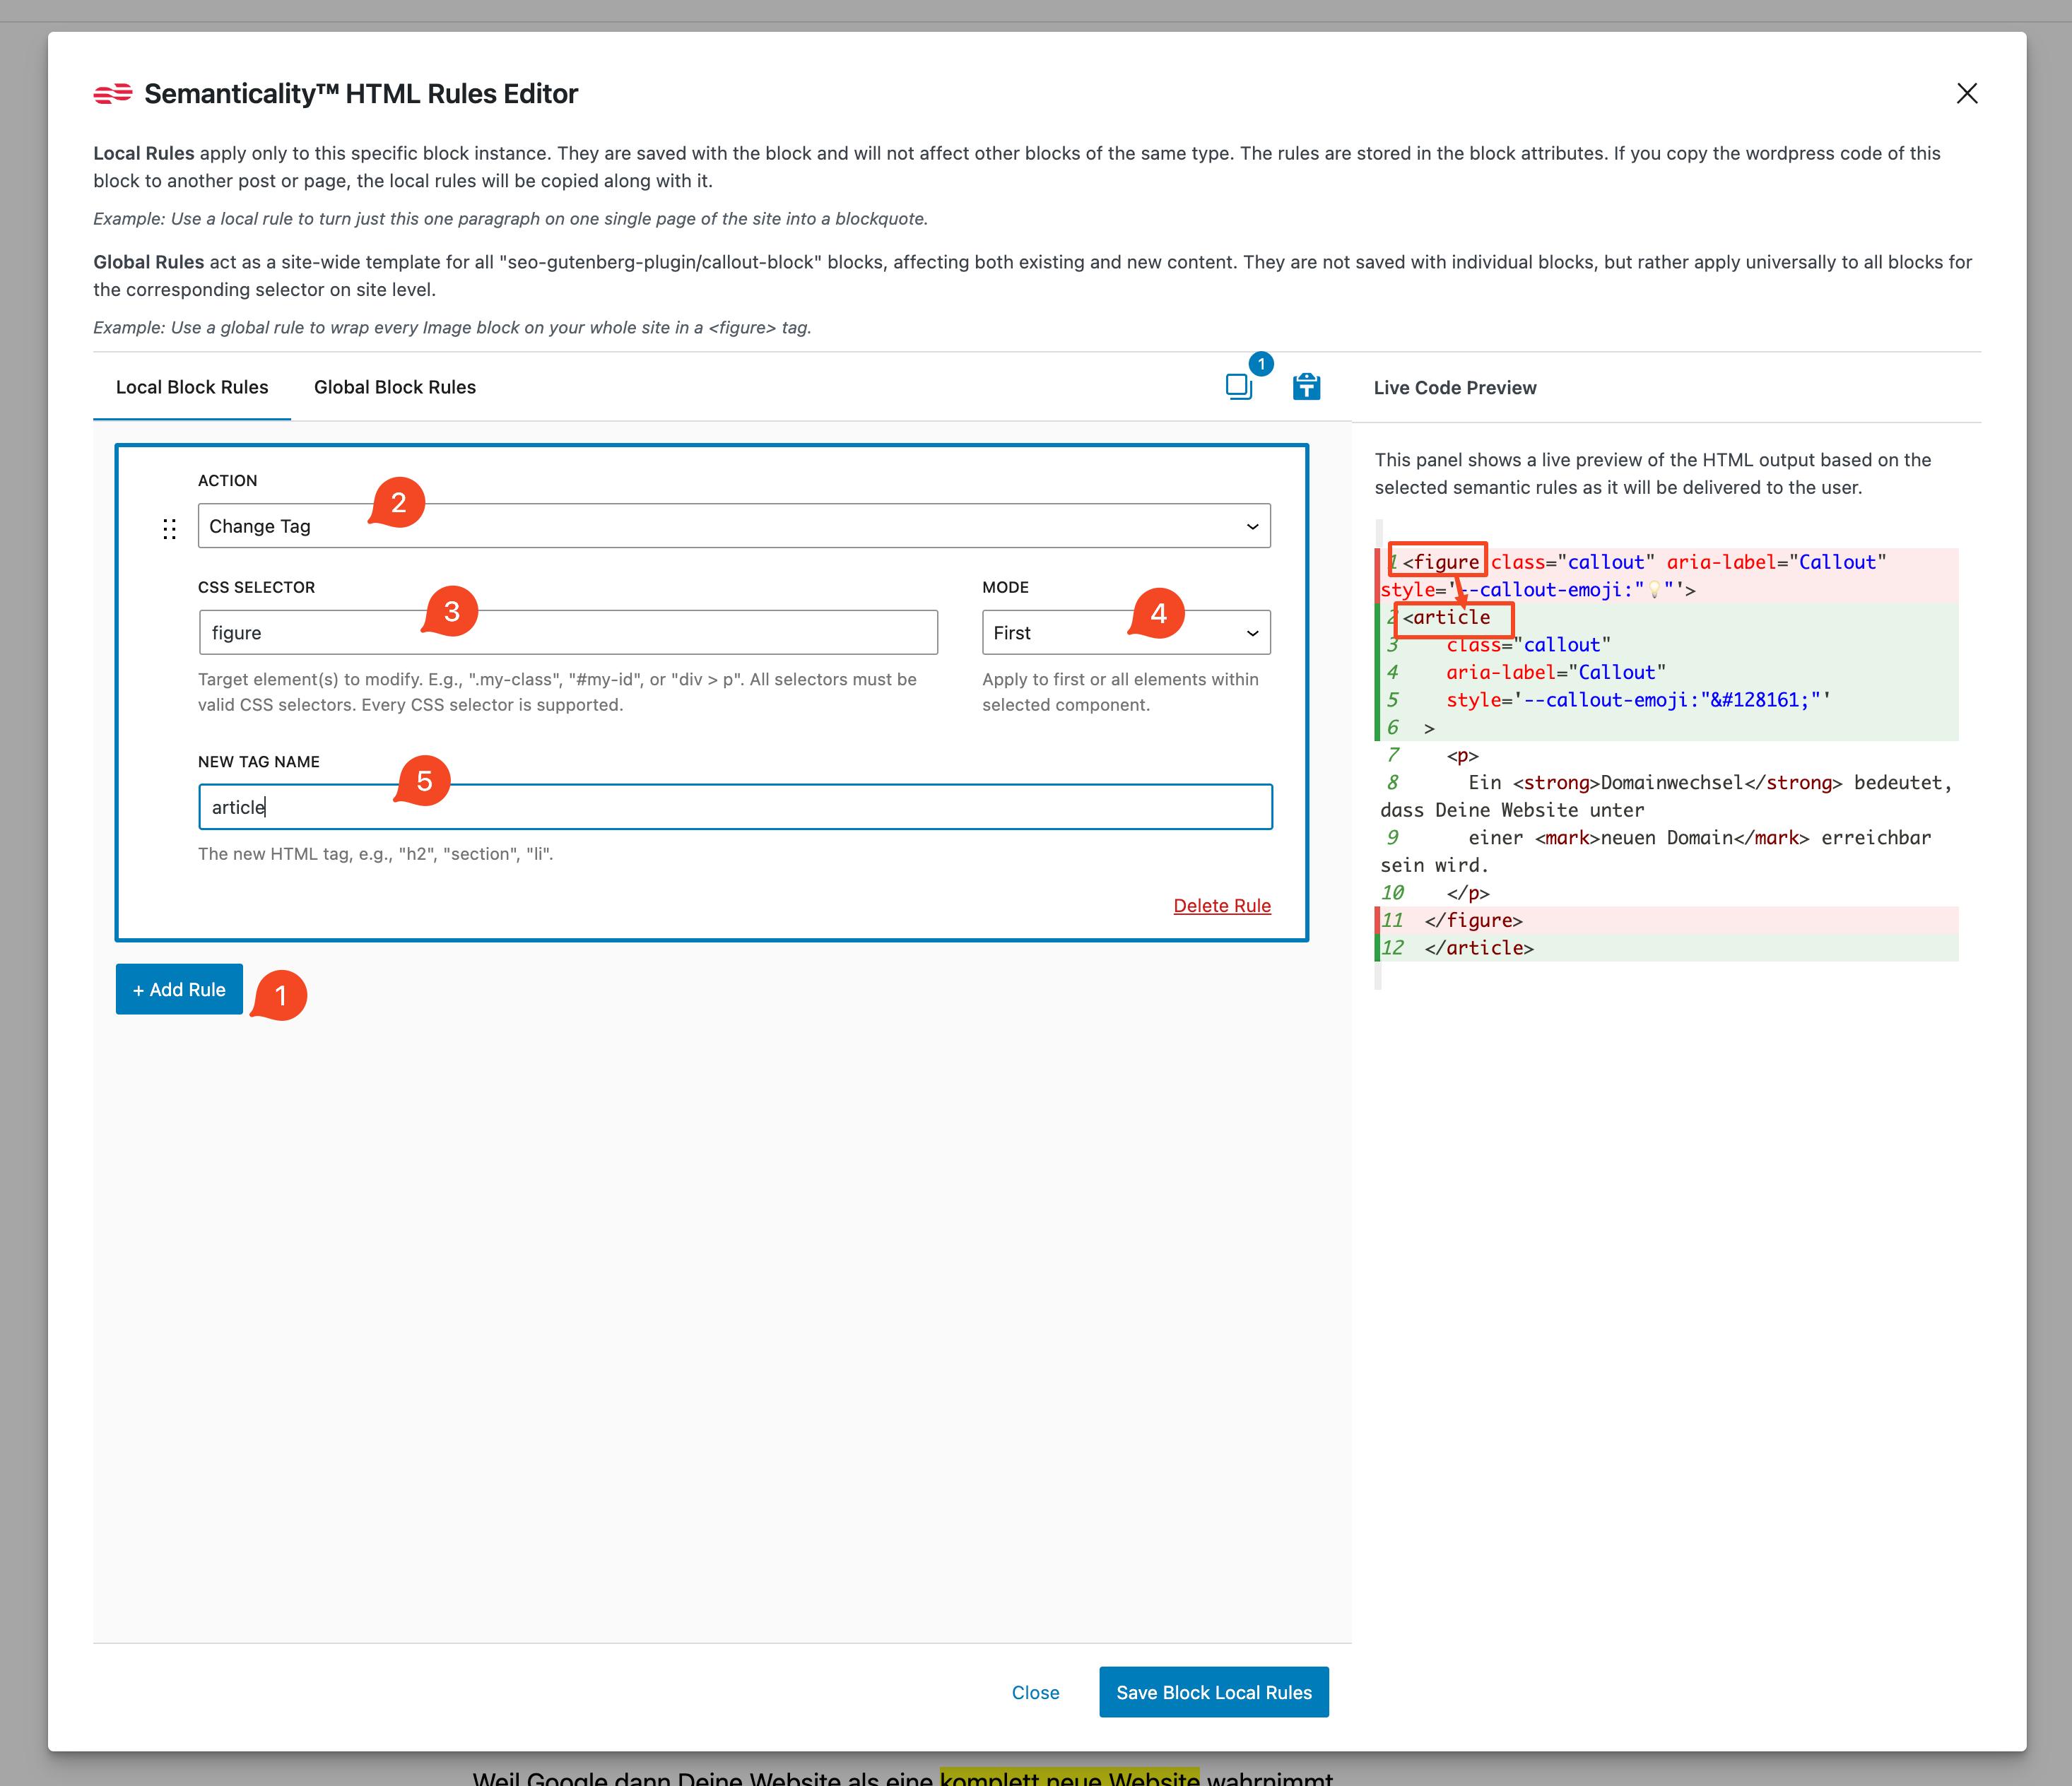
To begin working with the Semanticality™ plugin, follow these steps:
-
Open a post or page in the editor. Semanticality™ works directly within the block editing process. To get started, open any post or page in the Gutenberg editor. Ensure the plugin is installed and activated, and the license is entered. If a plugin update is available, be sure to install it.
-
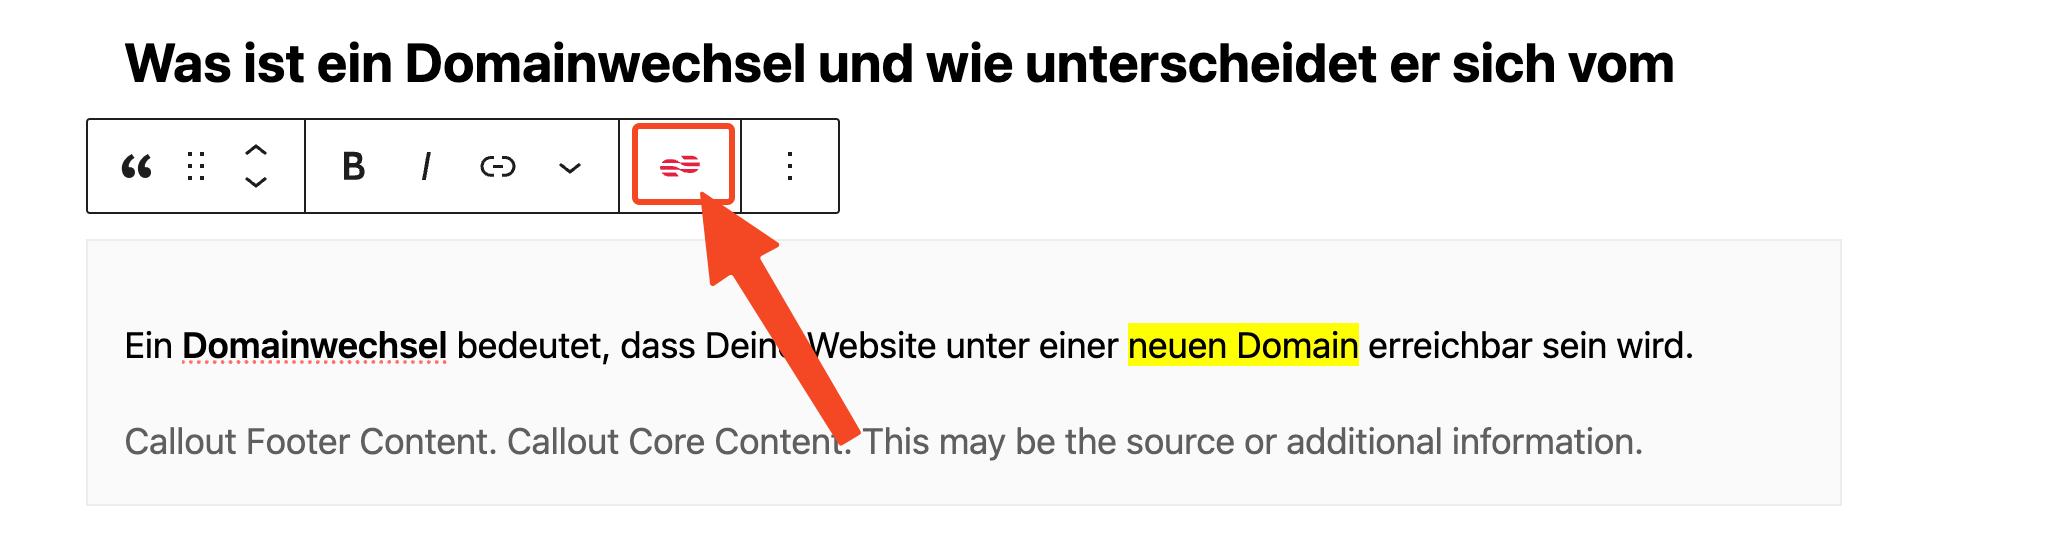
Select the desired block. Once the block is selected, a new "Semanticality™ Rules" button will appear in the top toolbar – this is your access to the rules editor.
-
Click the "Semanticality™ Rules" button. A modal window will appear with the editor, where you can add and manage rules.
-
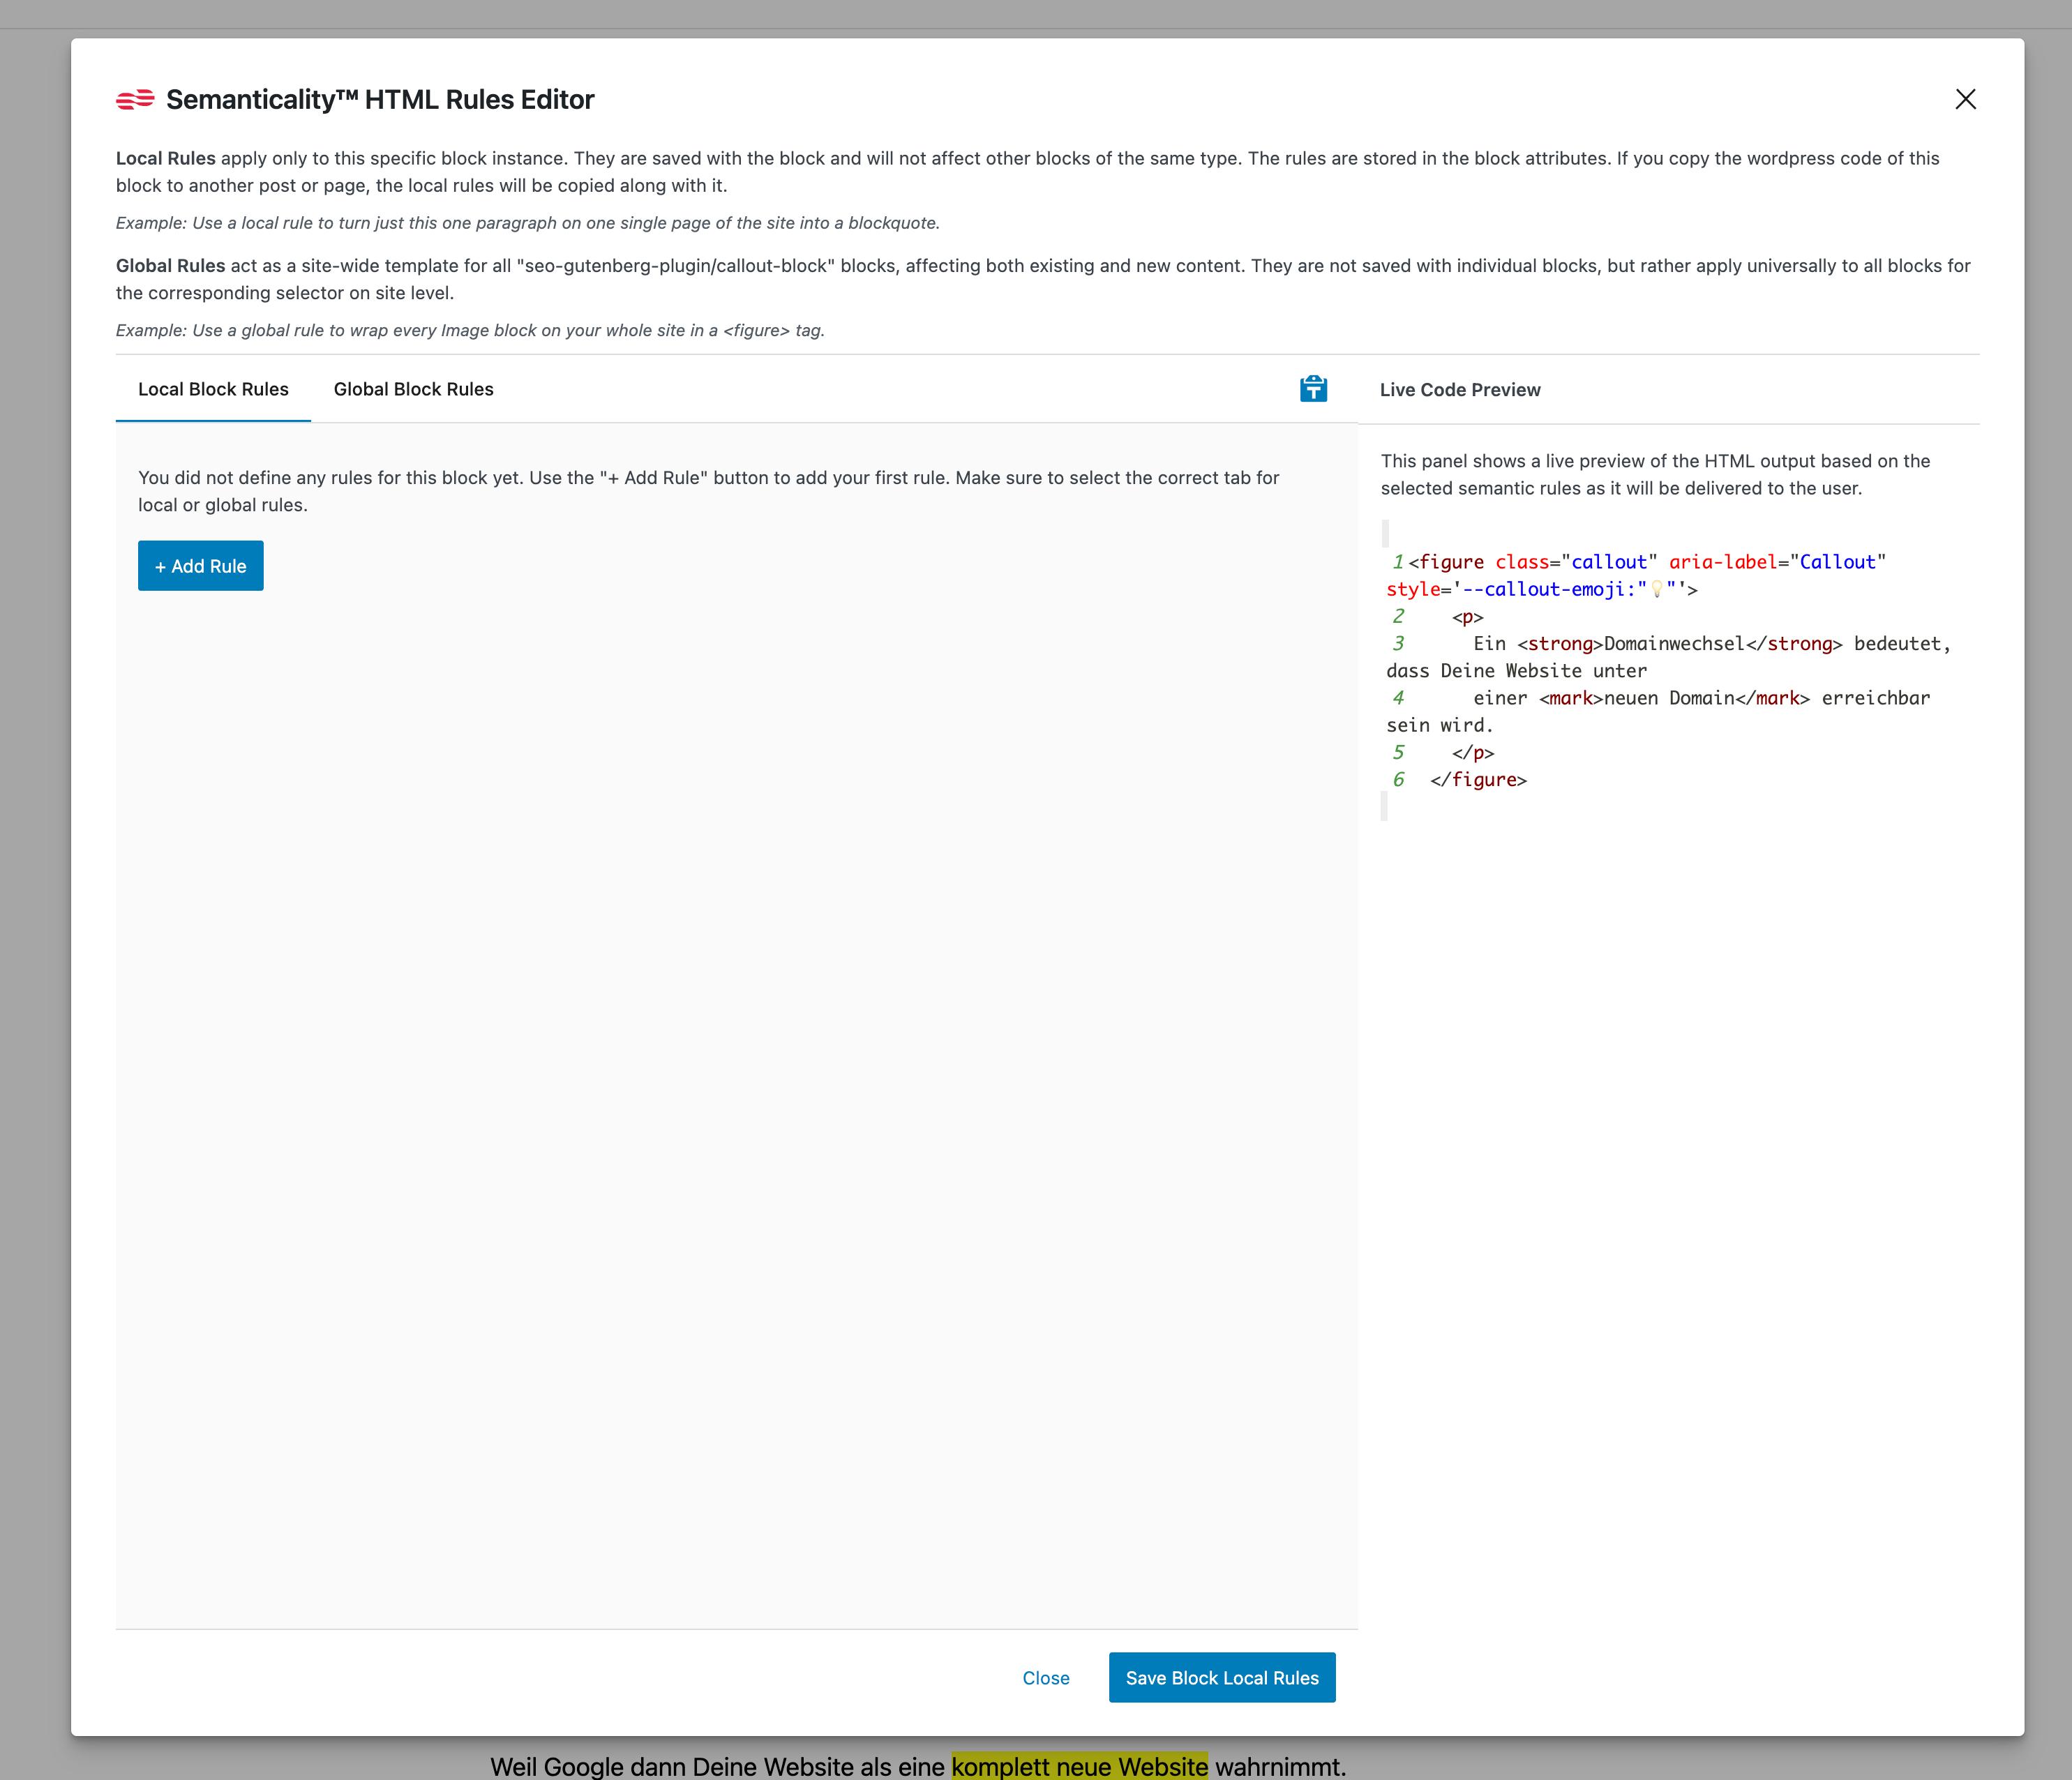
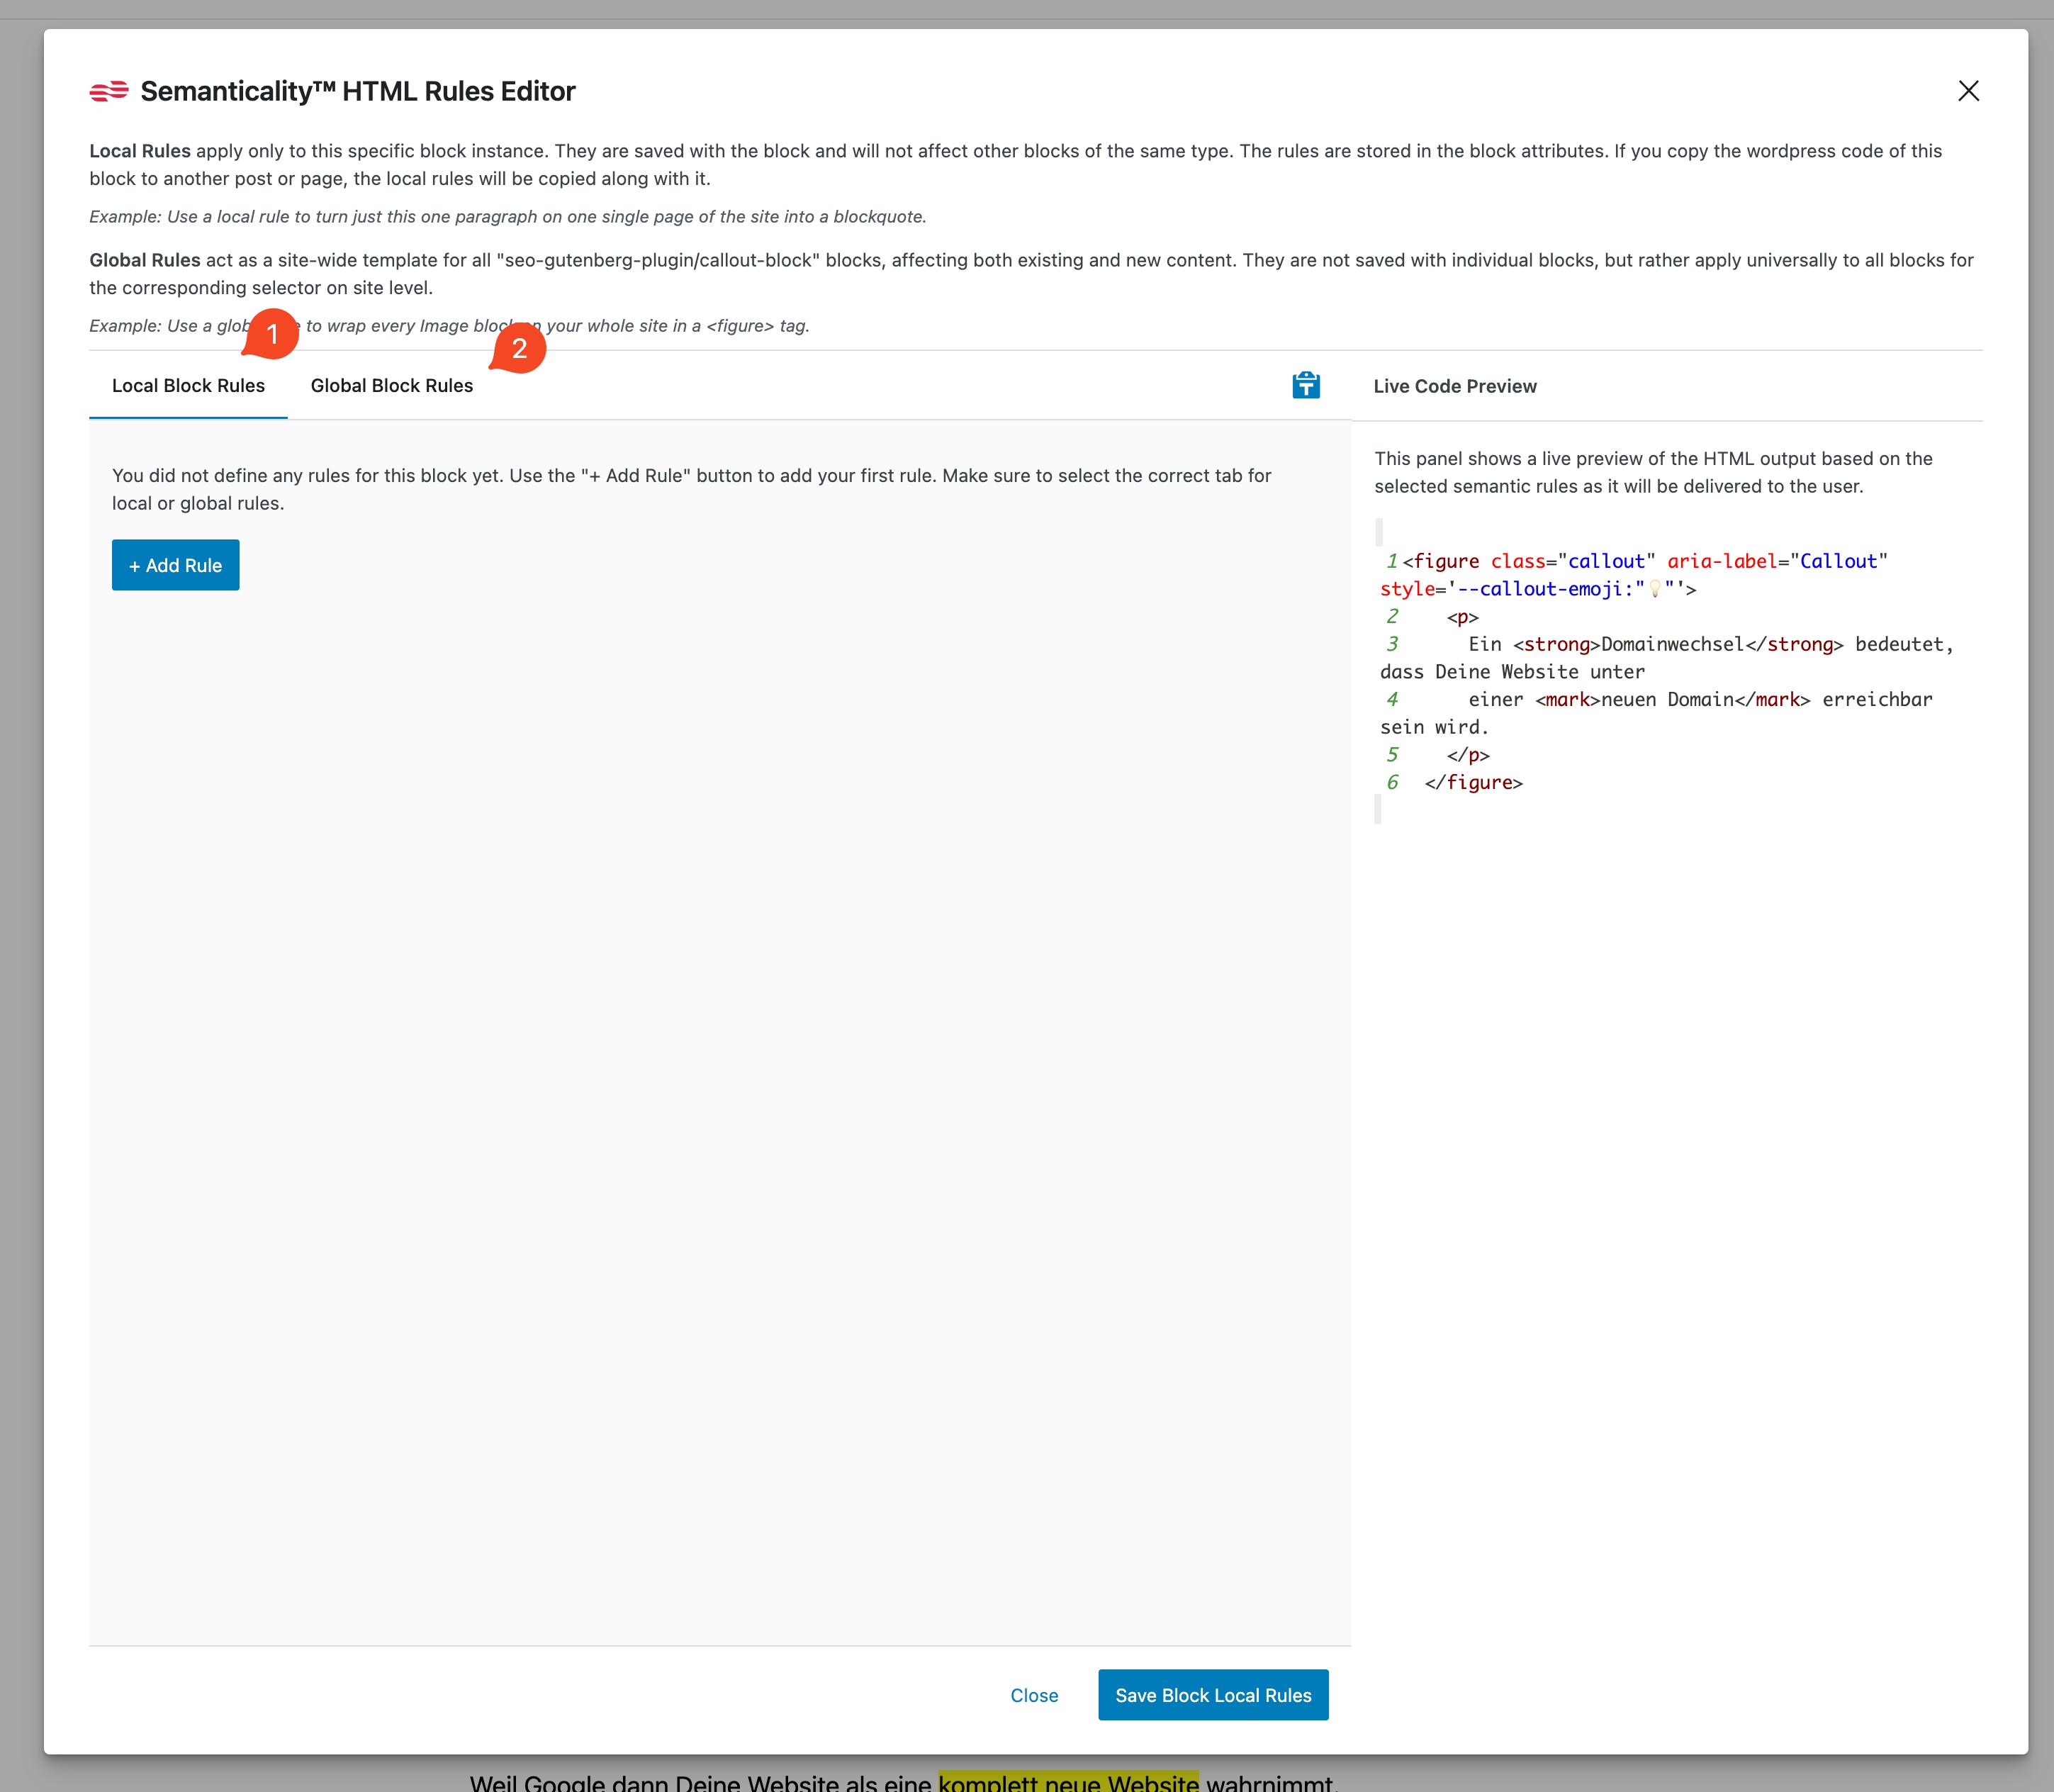
Select the tab:
- (1) Local Block Rules – if you want to create rules only for this specific block on this particular page.
- (2) Global Block Rules – if you want the rule to automatically apply to all blocks of this type across the entire site on all pages and posts.
-
Add a new rule. Click "+ Add Rule," specify a CSS selector, choose an action (e.g., change tag or attribute), and set the parameters.
-
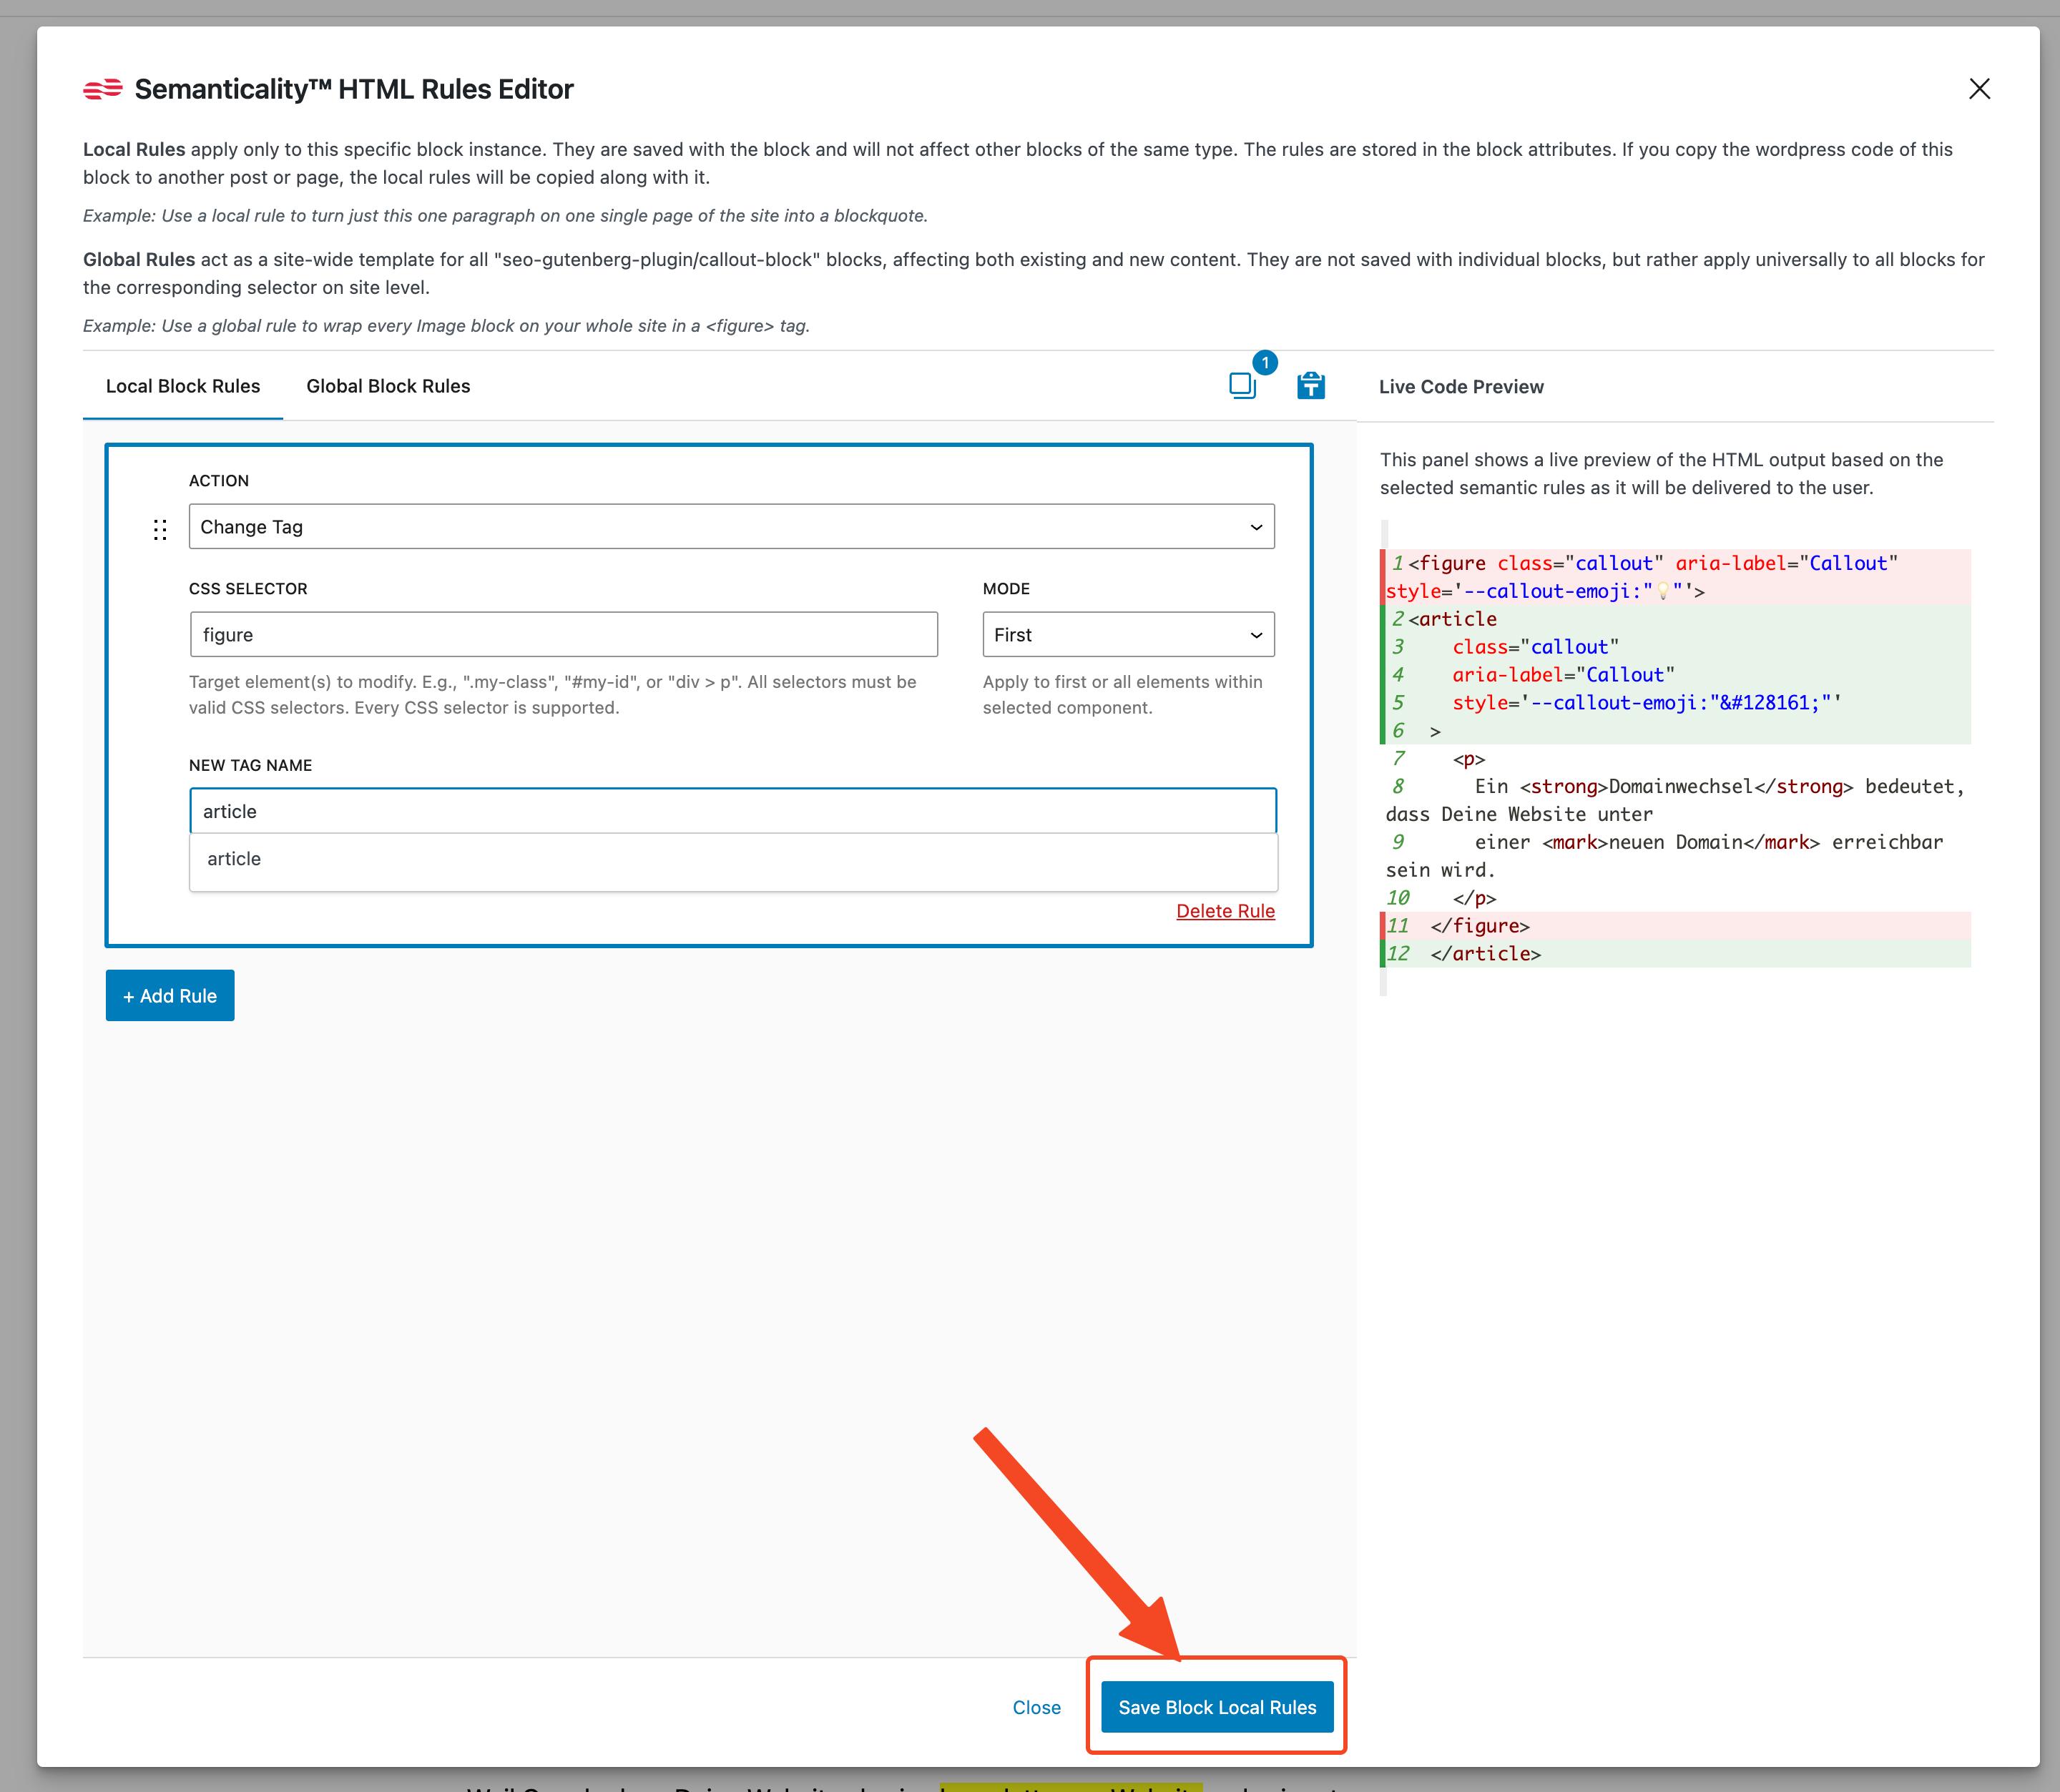
Save the rules. If editing locally – rules are saved within the block. If globally – rules are immediately applied to all blocks of the corresponding type.
-
Publish or update the post. This is a mandatory step for local rules: until the post is saved, local changes remain only in the editor. For global rules, saving the post is not required – they are applied immediately. Therefore, apply global rules with caution.
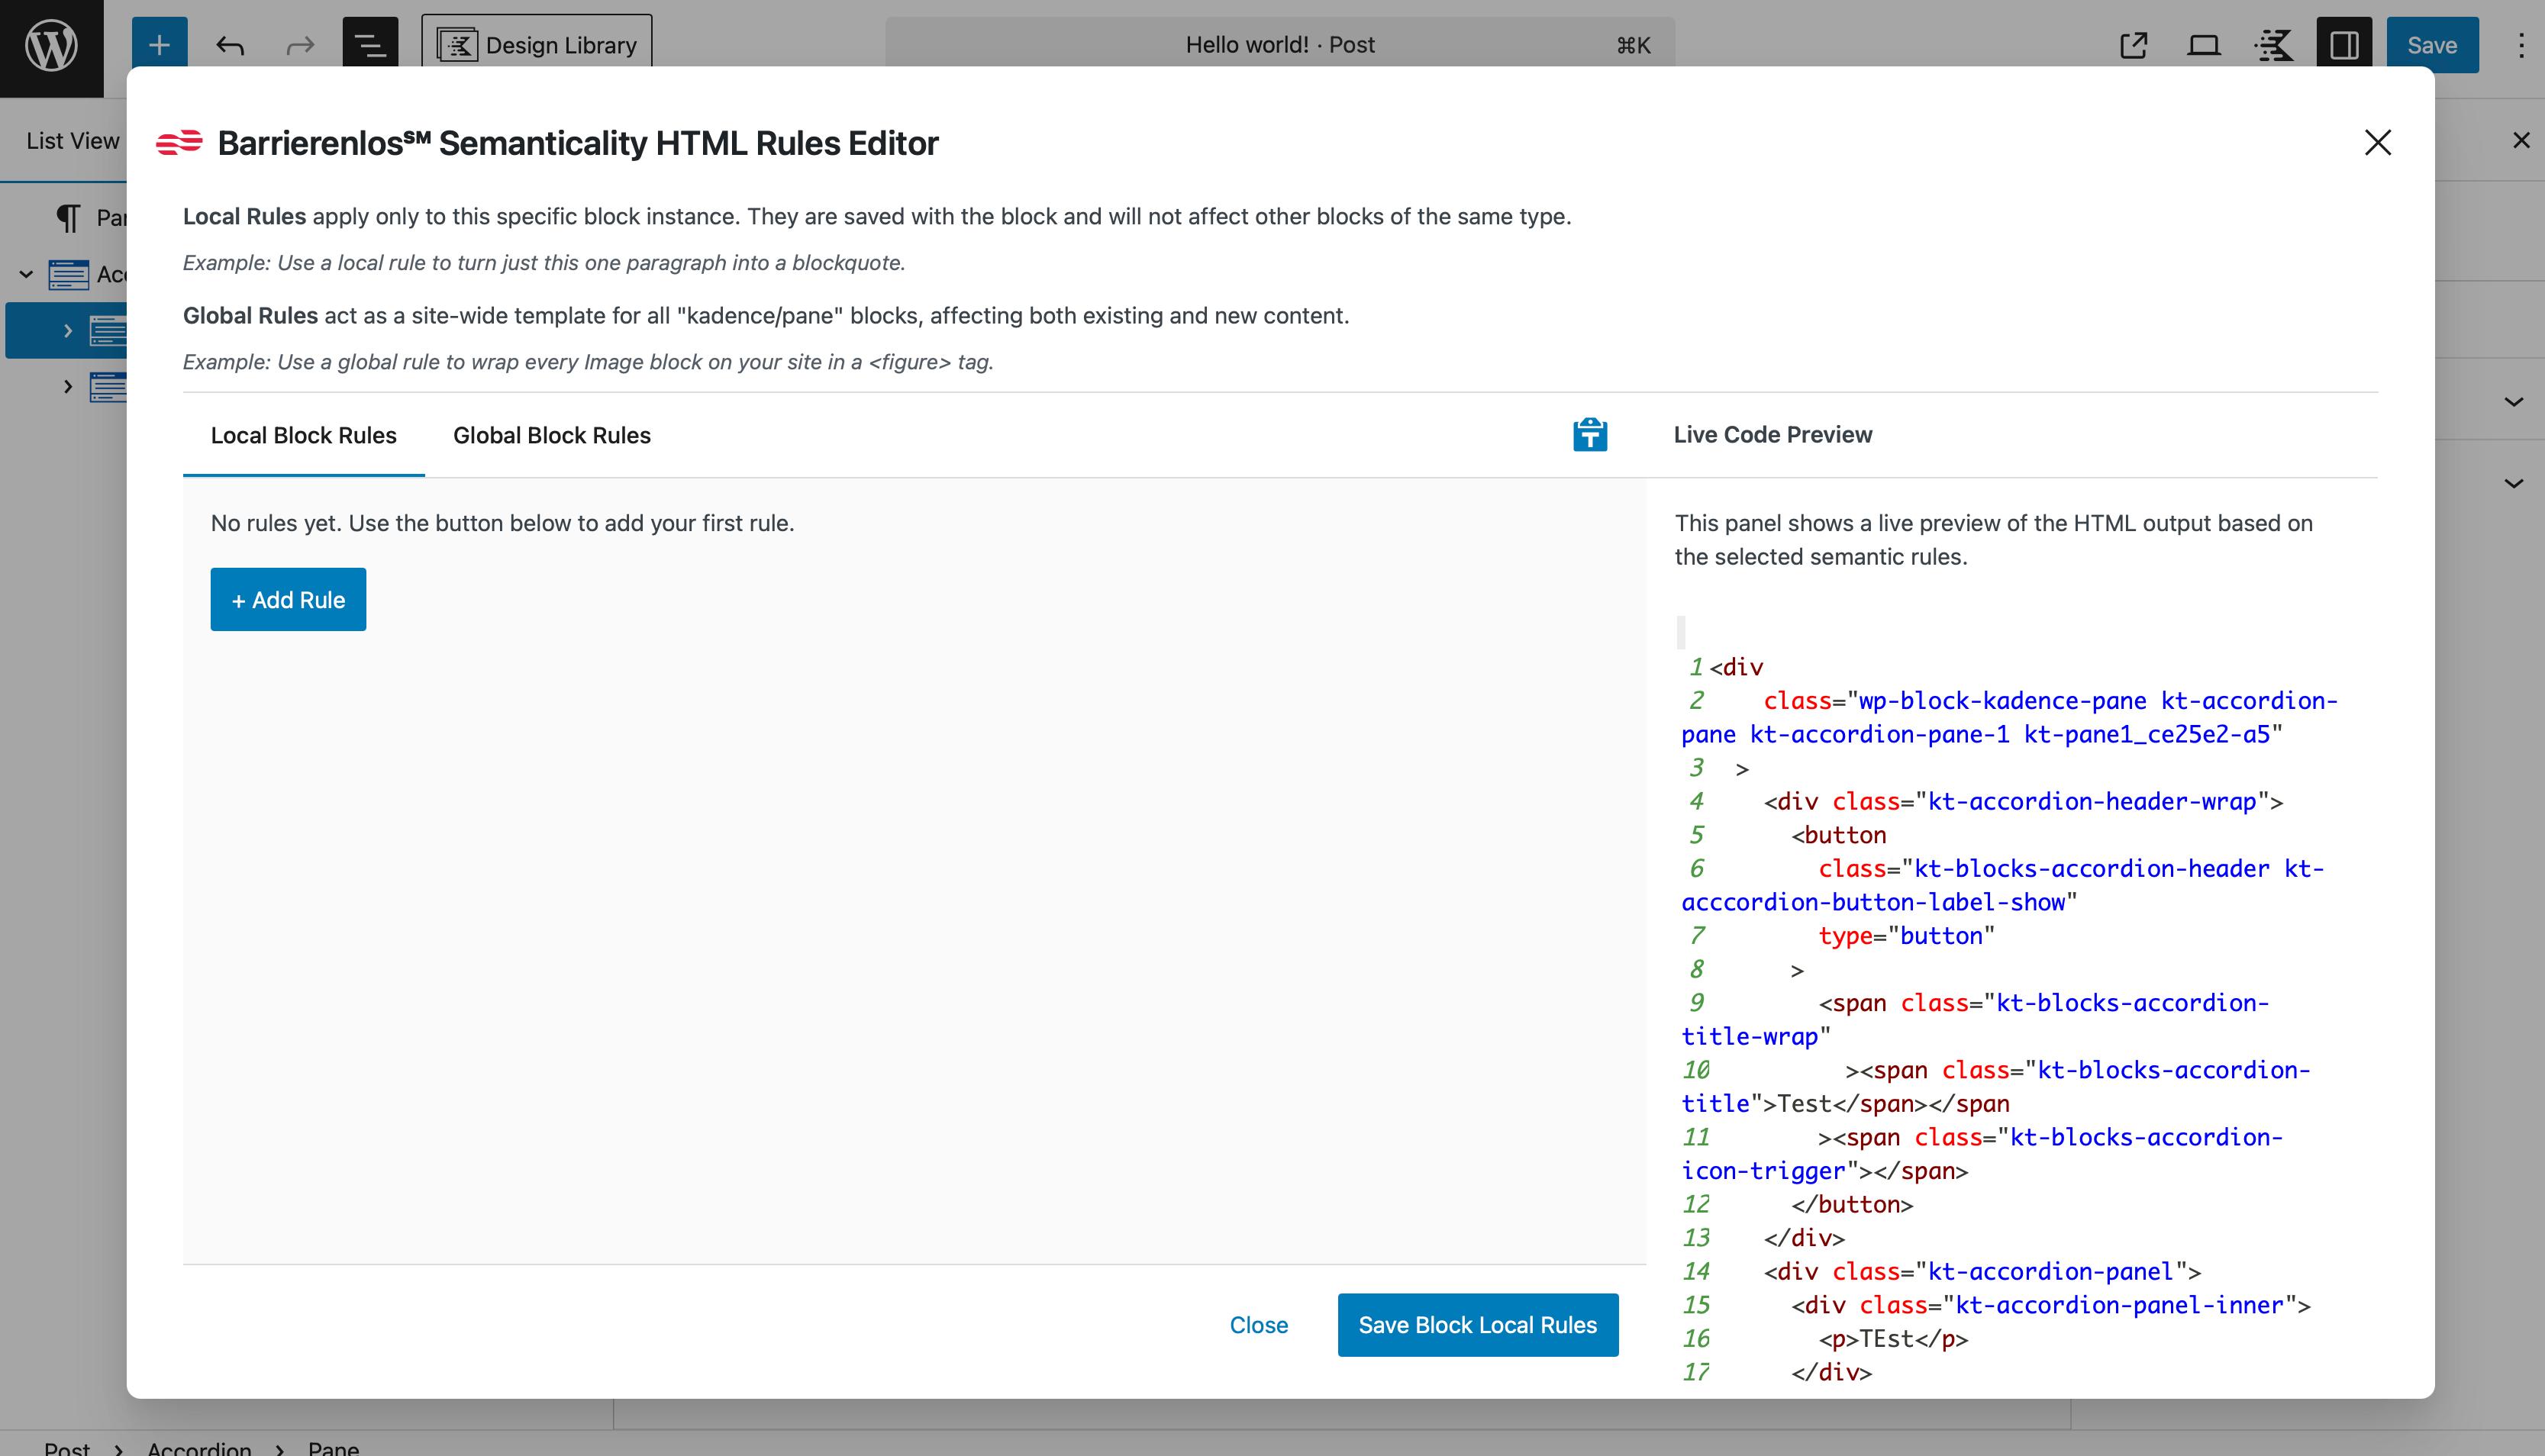
Semanticality™ Rules Editor Interface
The Semanticality™ Rules Editor is a powerful tool for creating and managing rules. In this section, we will delve into its interface and functionality.
Interface Overview
The Semanticality™ Rules Editor is a separate window that opens on top of the WordPress Gutenberg interface.
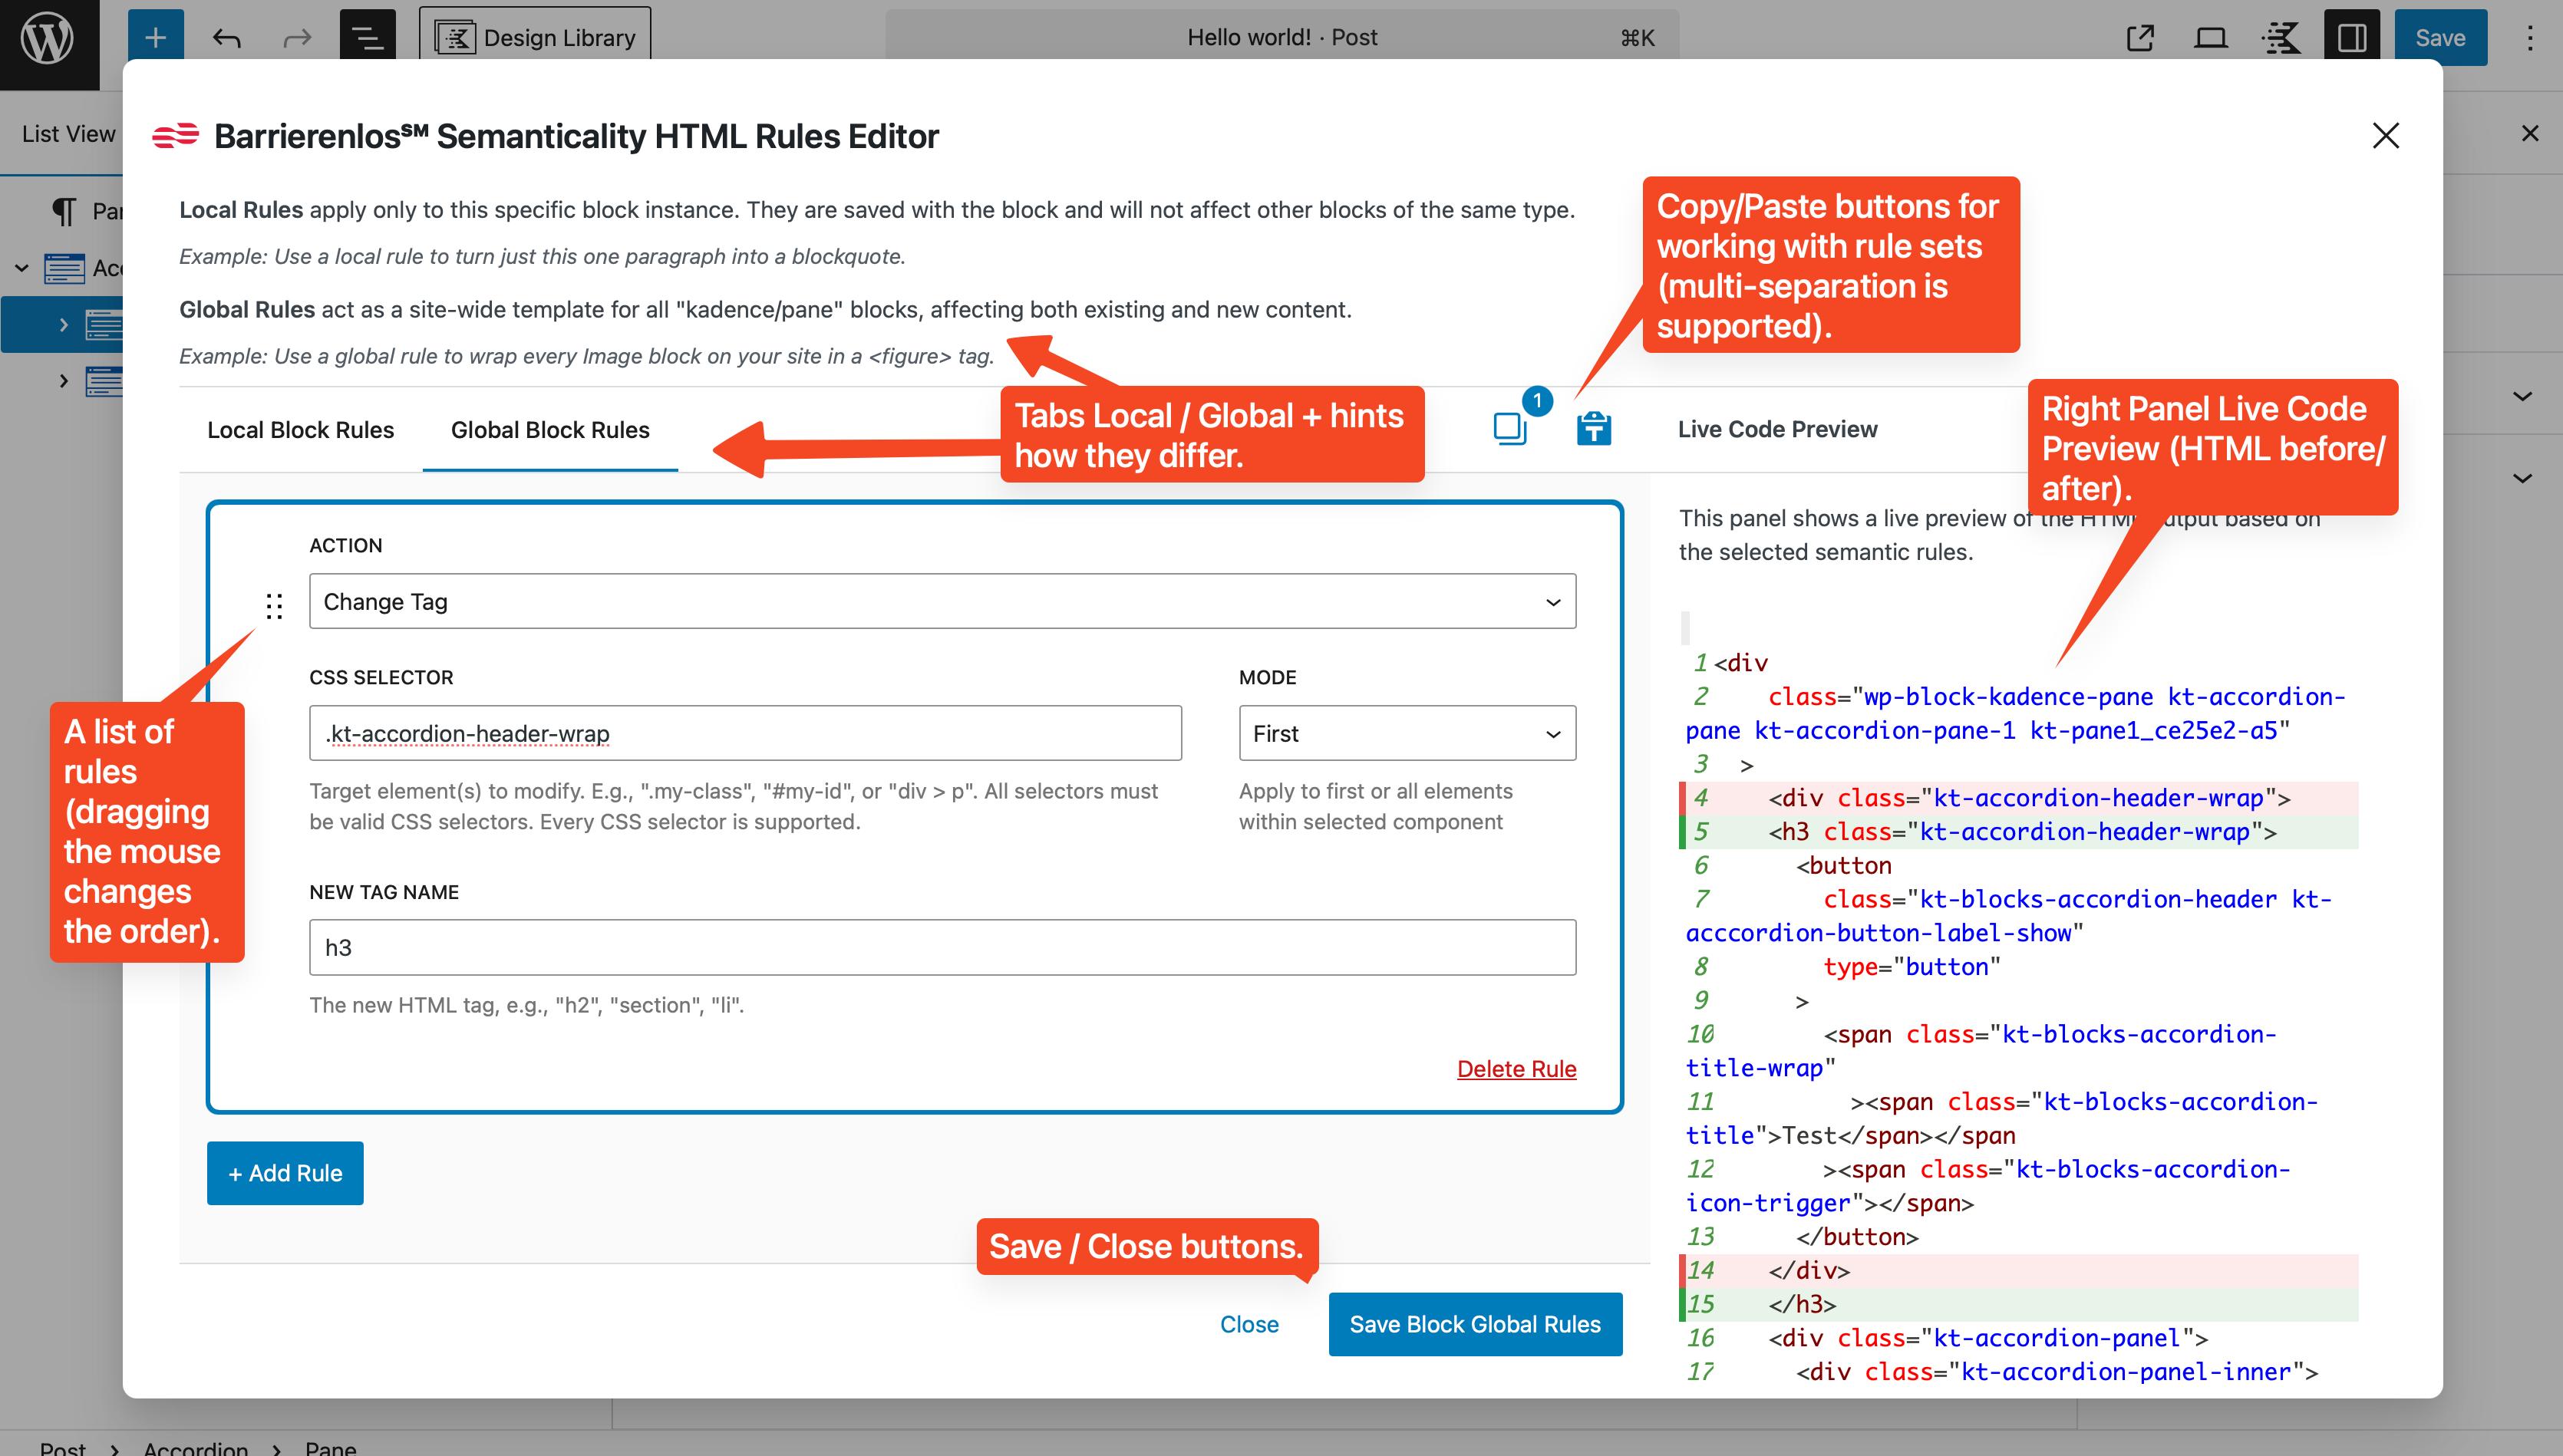
It features several key areas:
- Local and Global tabs, allowing you to switch between rule application levels.
- Copy and Paste buttons for working with rule sets. Multiple selection is supported: you can select several rules at once and copy them.
- The list of rules. Order matters, so drag-and-drop is supported to change the sequence. Lower rules can override upper ones.
- Save and Close buttons.
- The right-hand Live Code Preview panel, showing the difference in the block's HTML before and after applying the rules.
Keyboard Shortcuts
The editor supports standard keyboard shortcuts:
- Left-click — selects a single rule.
Shift+Click— selects a range of rules for copying.Cmd/Ctrl+C— copies selected rules.Cmd/Ctrl+V— pastes rules.Delete/Backspace— deletes selected rules.Cmd/Ctrl+Click— adds or removes a specific rule from the selection.
These features make working with a large number of rules more convenient and faster. Currently, overriding these combinations is unfortunately not possible – this will be added in new plugin versions.
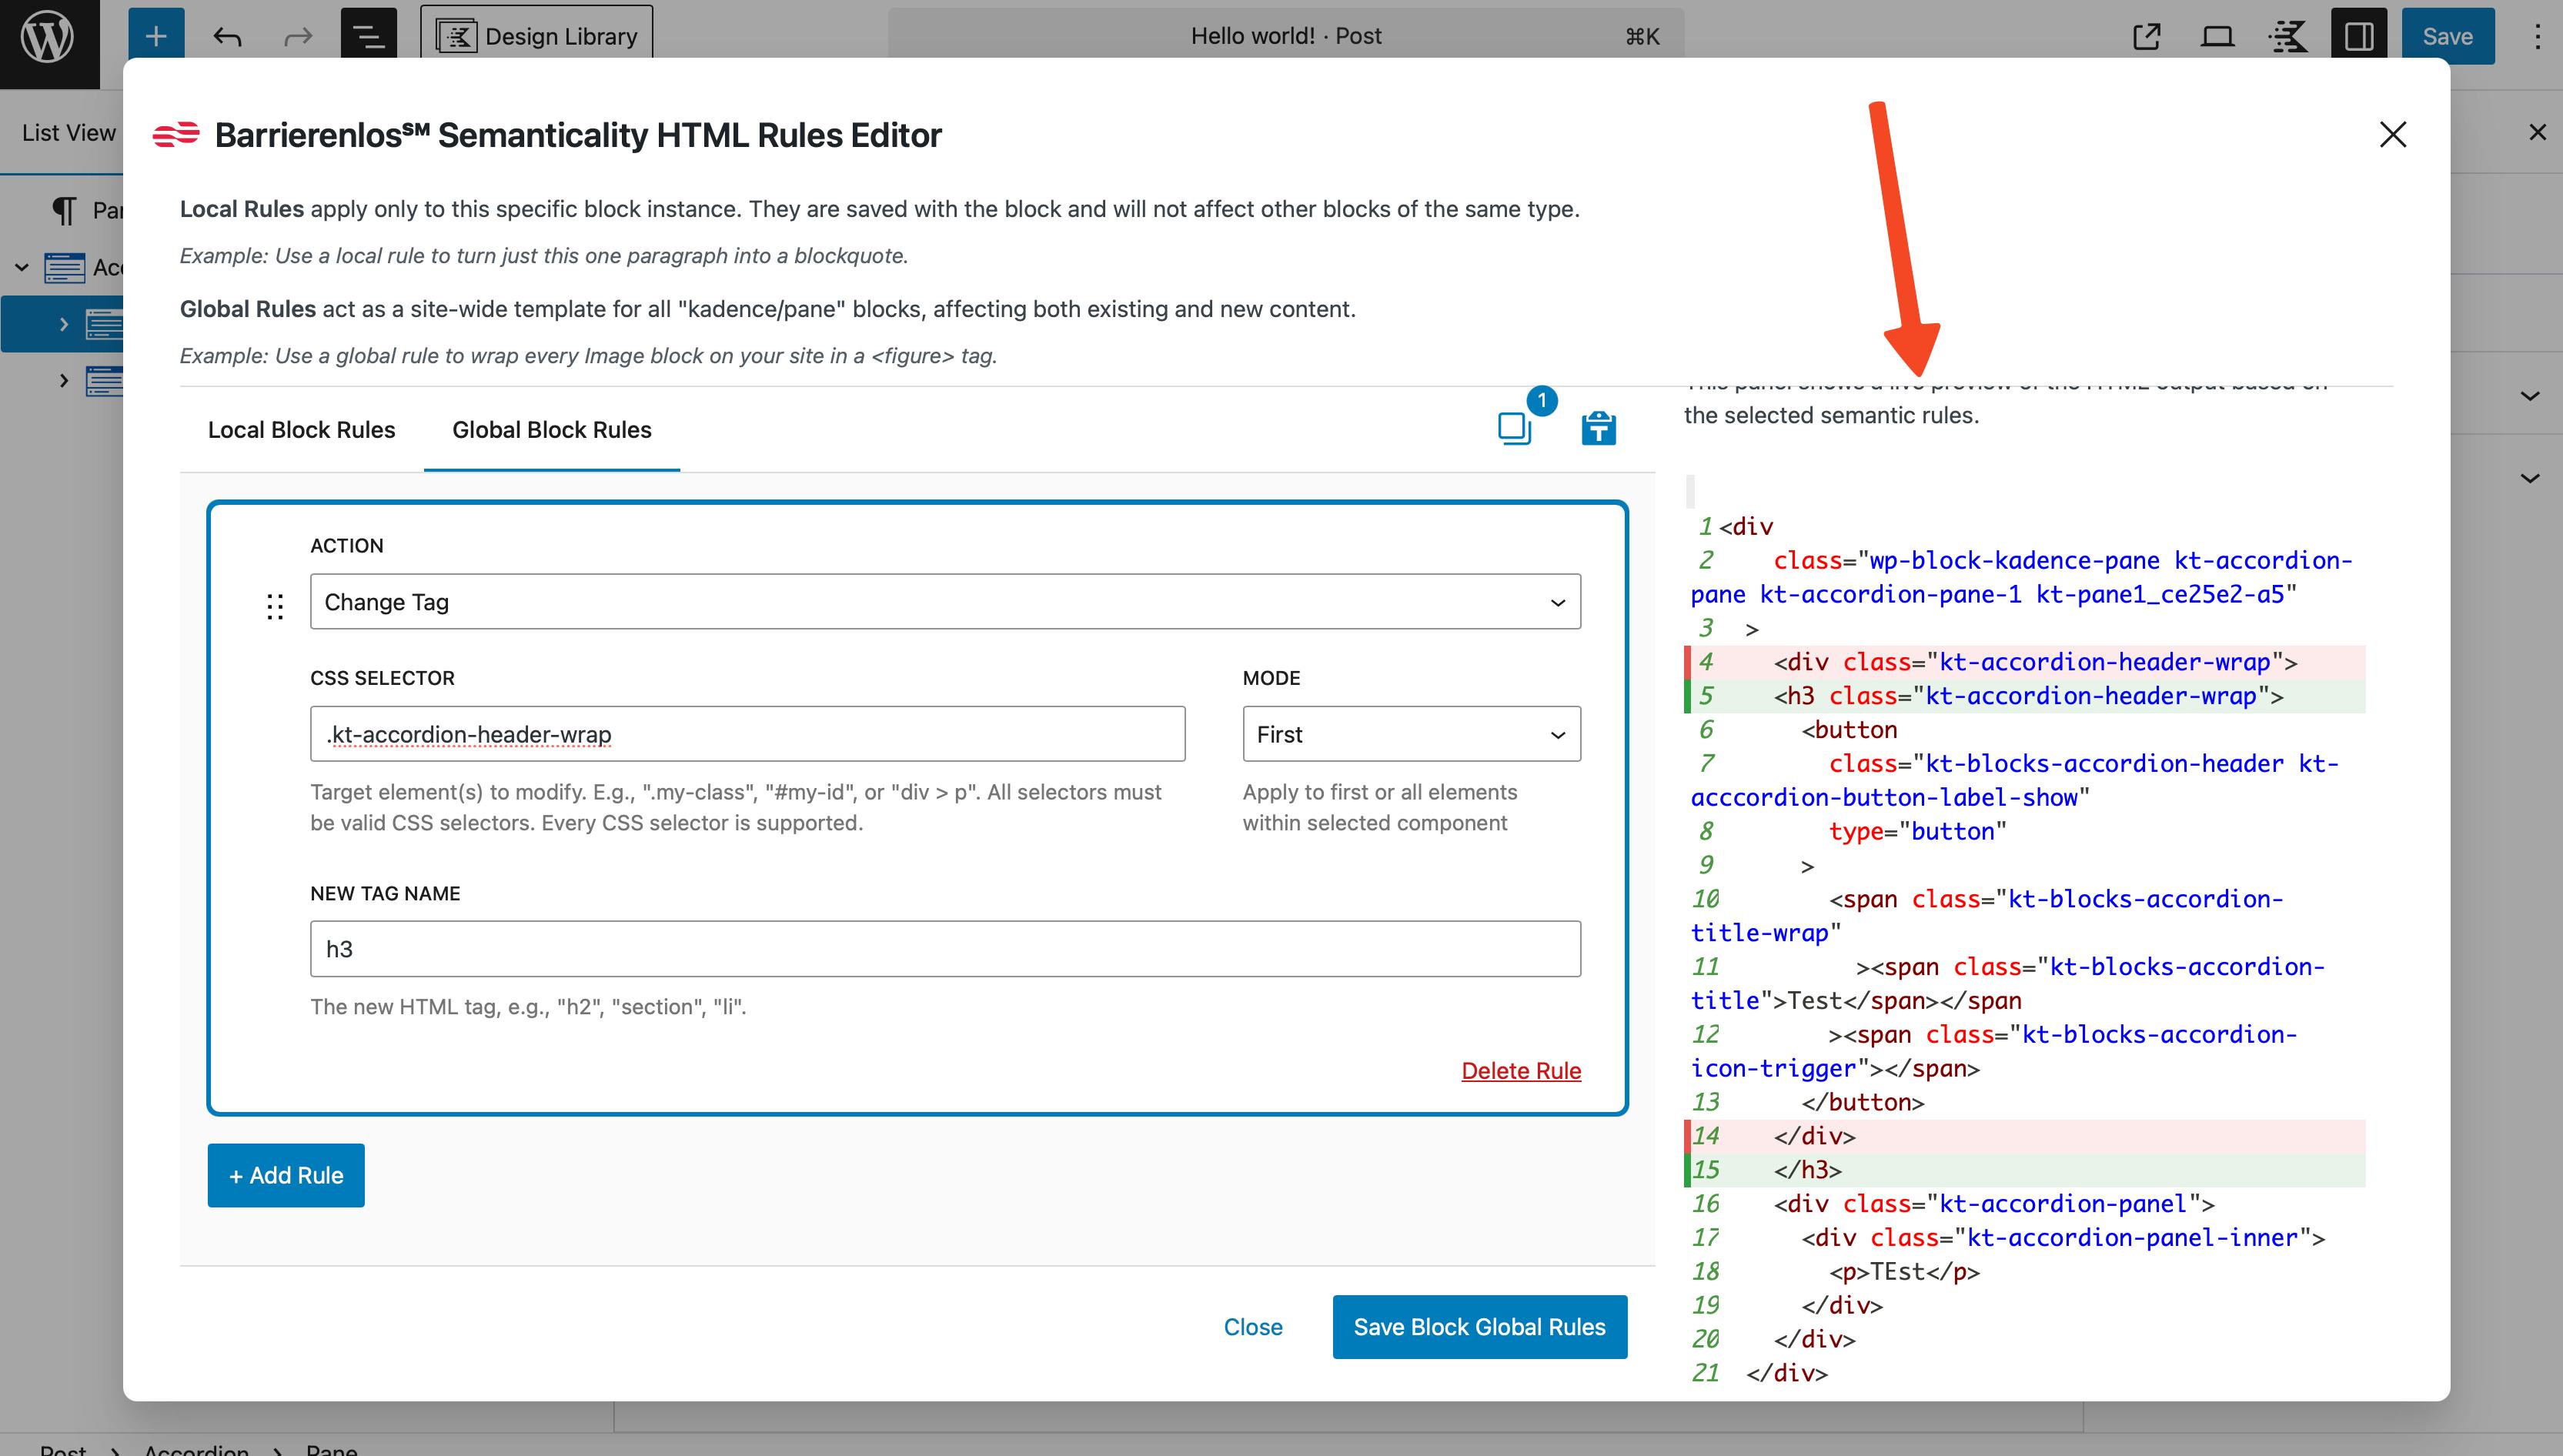
Live Code Preview
The built-in Live Code Preview panel on the right helps you immediately see the difference between the original HTML and the resulting code after applying the rules. This is especially important in complex scenarios: you can instantly verify that the changes are working exactly as intended.
Sidebar Site/Page Rules Panel
In addition to the toolbar button, Semanticality™ adds a sidebar panel to the Gutenberg inspector.
- The panel contains two actions:
- Site Rules – opens a global editor for rules that affect the entire website.
- Page Rules – opens a per-post editor for rules that override Site Rules only for the current page.
- Both editors reuse the same RuleEditor UI (rule list, drag-and-drop, copy/paste, Live Preview) but work at a higher level than Local/Global block rules.
Conceptually, Site and Global rules are similar:
- Both are stored in site-level settings and do not require saving the current post.
- The difference is scope:
- Site rules apply to the whole HTML document (including
<head>and<body>) for every request. - Global rules apply only to the rendered HTML of blocks of a specific type.
- Site rules apply to the whole HTML document (including
Use Site rules for cross-site defaults (tab order, ARIA attributes, global IDs) and Page rules for one-off landing pages or templates that need unique semantics on top of that baseline.
How Semanticality™ Works and its Functionality
Semanticality™ acts as an intermediary layer between Gutenberg and the final HTML. Each time a block is rendered, the plugin "traverses" its structure and checks if there are rules for that block. If rules exist, the HTML is modified on the fly.
The plugin's core relies on working with CSS selectors. This is a common way to specify which element needs to be modified. The selector is automatically converted to XPath to enable working with the document tree.
Available Actions
- Change Tag — replaces one element's tag with another (e.g.,
<div>→<section>or<p>→<h3>). This is particularly useful for improving heading hierarchy or transforming "meaningless" containers into semantically significant elements. - Modify Attribute — works with attributes. You can add new ones, replace existing ones, or remove unnecessary ones. This applies, for example, to ARIA attributes,
class,id, microdata, etc.
Selector Application Modes
- First (similar to querySelector) — The rule applies only to the first element found within the block.
- All (similar to querySelectorAll) — The rule applies to all elements that match the selector.
Inserting an Attribute Value:
First, choose the attribute:
- CSS Selector — any valid CSS selector, including:
.class,#id,div > p,figure img,a[href^="/"],:not(),:nth-child(), etc.
Then, choose the action:
- Add / Replace — writes the value entirely, completely replacing the old one. If the attribute does not exist, it will be created.
- Append — adds the value to the end (for
class– with a space, forstyle– with a semicolon) after the existing value. - Prepend — adds the value to the beginning of the attribute before the existing value.
- Remove — completely removes the attribute.
And enter the value:
- Attribute Value — the text value of the attribute. Variables can be used (see below).
Variables in Attribute Values within Rules
Semanticality™ supports dynamic substitutions in attribute values. This allows you to create unique IDs or use post data without manual entry. In the Attribute Value field, you can insert dynamic placeholders:
{post_title}— the title of the current post from the WordPress database.{post_id}— the ID of the post from the WordPress database.{meta_key}— the value of a custom meta field from the WordPress database. Example:{meta_price}.{id_your-label}— a unique random ID for the duration of the block's rendering. Example:{id_your-label}→barrierenlos-abc123…, whereyour-labelis an arbitrary text label you define, andabc123is a random string.barrierenlosis a prefix to avoid conflicts with other IDs on the page.
These variables are especially useful, for example, for aria-labelledby / id pairings or for microdata.
Rule Types: Site, Page, Global and Local
Understanding the differences between rule layers is key to working correctly with the plugin.
- Site Rules – affect the entire website and run first. They are ideal for cross-site accessibility tweaks, default attributes (for example,
tabindex,role,aria-*) and global fallbacks. Site rules are configured through the separate Site Rules editor in the block editor sidebar or via the wp-admin settings page. - Page Rules – apply only to a specific post or page and override Site Rules before Global and Local rules are evaluated. They are useful for landing pages and special templates that require unique defaults without touching every block individually.
- Global Rules – tied to a block type (for example, all
core/imageblocks). They apply after Site and Page rules and before any Local rules. - Local Rules – tied to a specific block instance on a specific page. They have the highest priority in the chain.
The effective priority chain is:
Site → Page → Global → Local
Within each layer, rules are executed from top to bottom in the list; the last matching rule wins when several rules affect the same selector and attribute.
Local Rules (Tab Local Block Rules)
Local rules are stored directly within the block. This means they only apply to that specific instance. If you duplicate a block, the rules are duplicated along with it.
- Stored in the attributes of the specific block.
- Apply only to the current block.
- Require saving the post. If you close the editor without saving, all local changes will be lost.
Important: If you copy the entire post code (three dots → Code Editor) and paste it into another post, the local rules will travel with the blocks – this is a quick way to transfer rules for an entire page. For example, from a test version to a production one.
Global Rules (Tab Global Block Rules)
Global rules are saved in the site settings. They are applied immediately to all blocks of that type after saving the plugin settings.
- Stored in the site options.
- Apply to all pages and posts. Applied to all blocks of this type (including already published ones).
- Do not require saving the current post – changes take effect immediately after saving in the plugin.
Practical example: If you want all images (core/image) on the site to have loading="lazy", configure this once via global rules – and it will work everywhere.
Priorities and Rule Application Order
When working with multiple rules, it's important to understand which one will take precedence to avoid conflicts and unwanted effects.
-
Order in the list matters. Rules are applied from top to bottom within each layer. If two rules in the same layer affect the same element and the same attribute, the final value is determined by the last rule. This means "the last rule wins."
-
Rule layers have a fixed priority. The priority chain is: Site → Page → Global → Local. If rules from different layers conflict (same selector/attribute), the layer further to the right wins.
-
Parent and child blocks. In the preview, when selecting a parent, children are displayed with their local rules already applied. If you create a rule in the parent block, it will take precedence over the child's changes.
Copying/Pasting Rule Sets
In the Semanticality™ editor, you can copy and paste rule sets in JSON format. This is convenient for migration or backup.
-
Select the desired rules. Use
Shift+Clickto select a range orCmd/Ctrl+Clickto select individual rules. Once rules are selected, a number will appear near the Copy button, indicating the quantity of selected rules.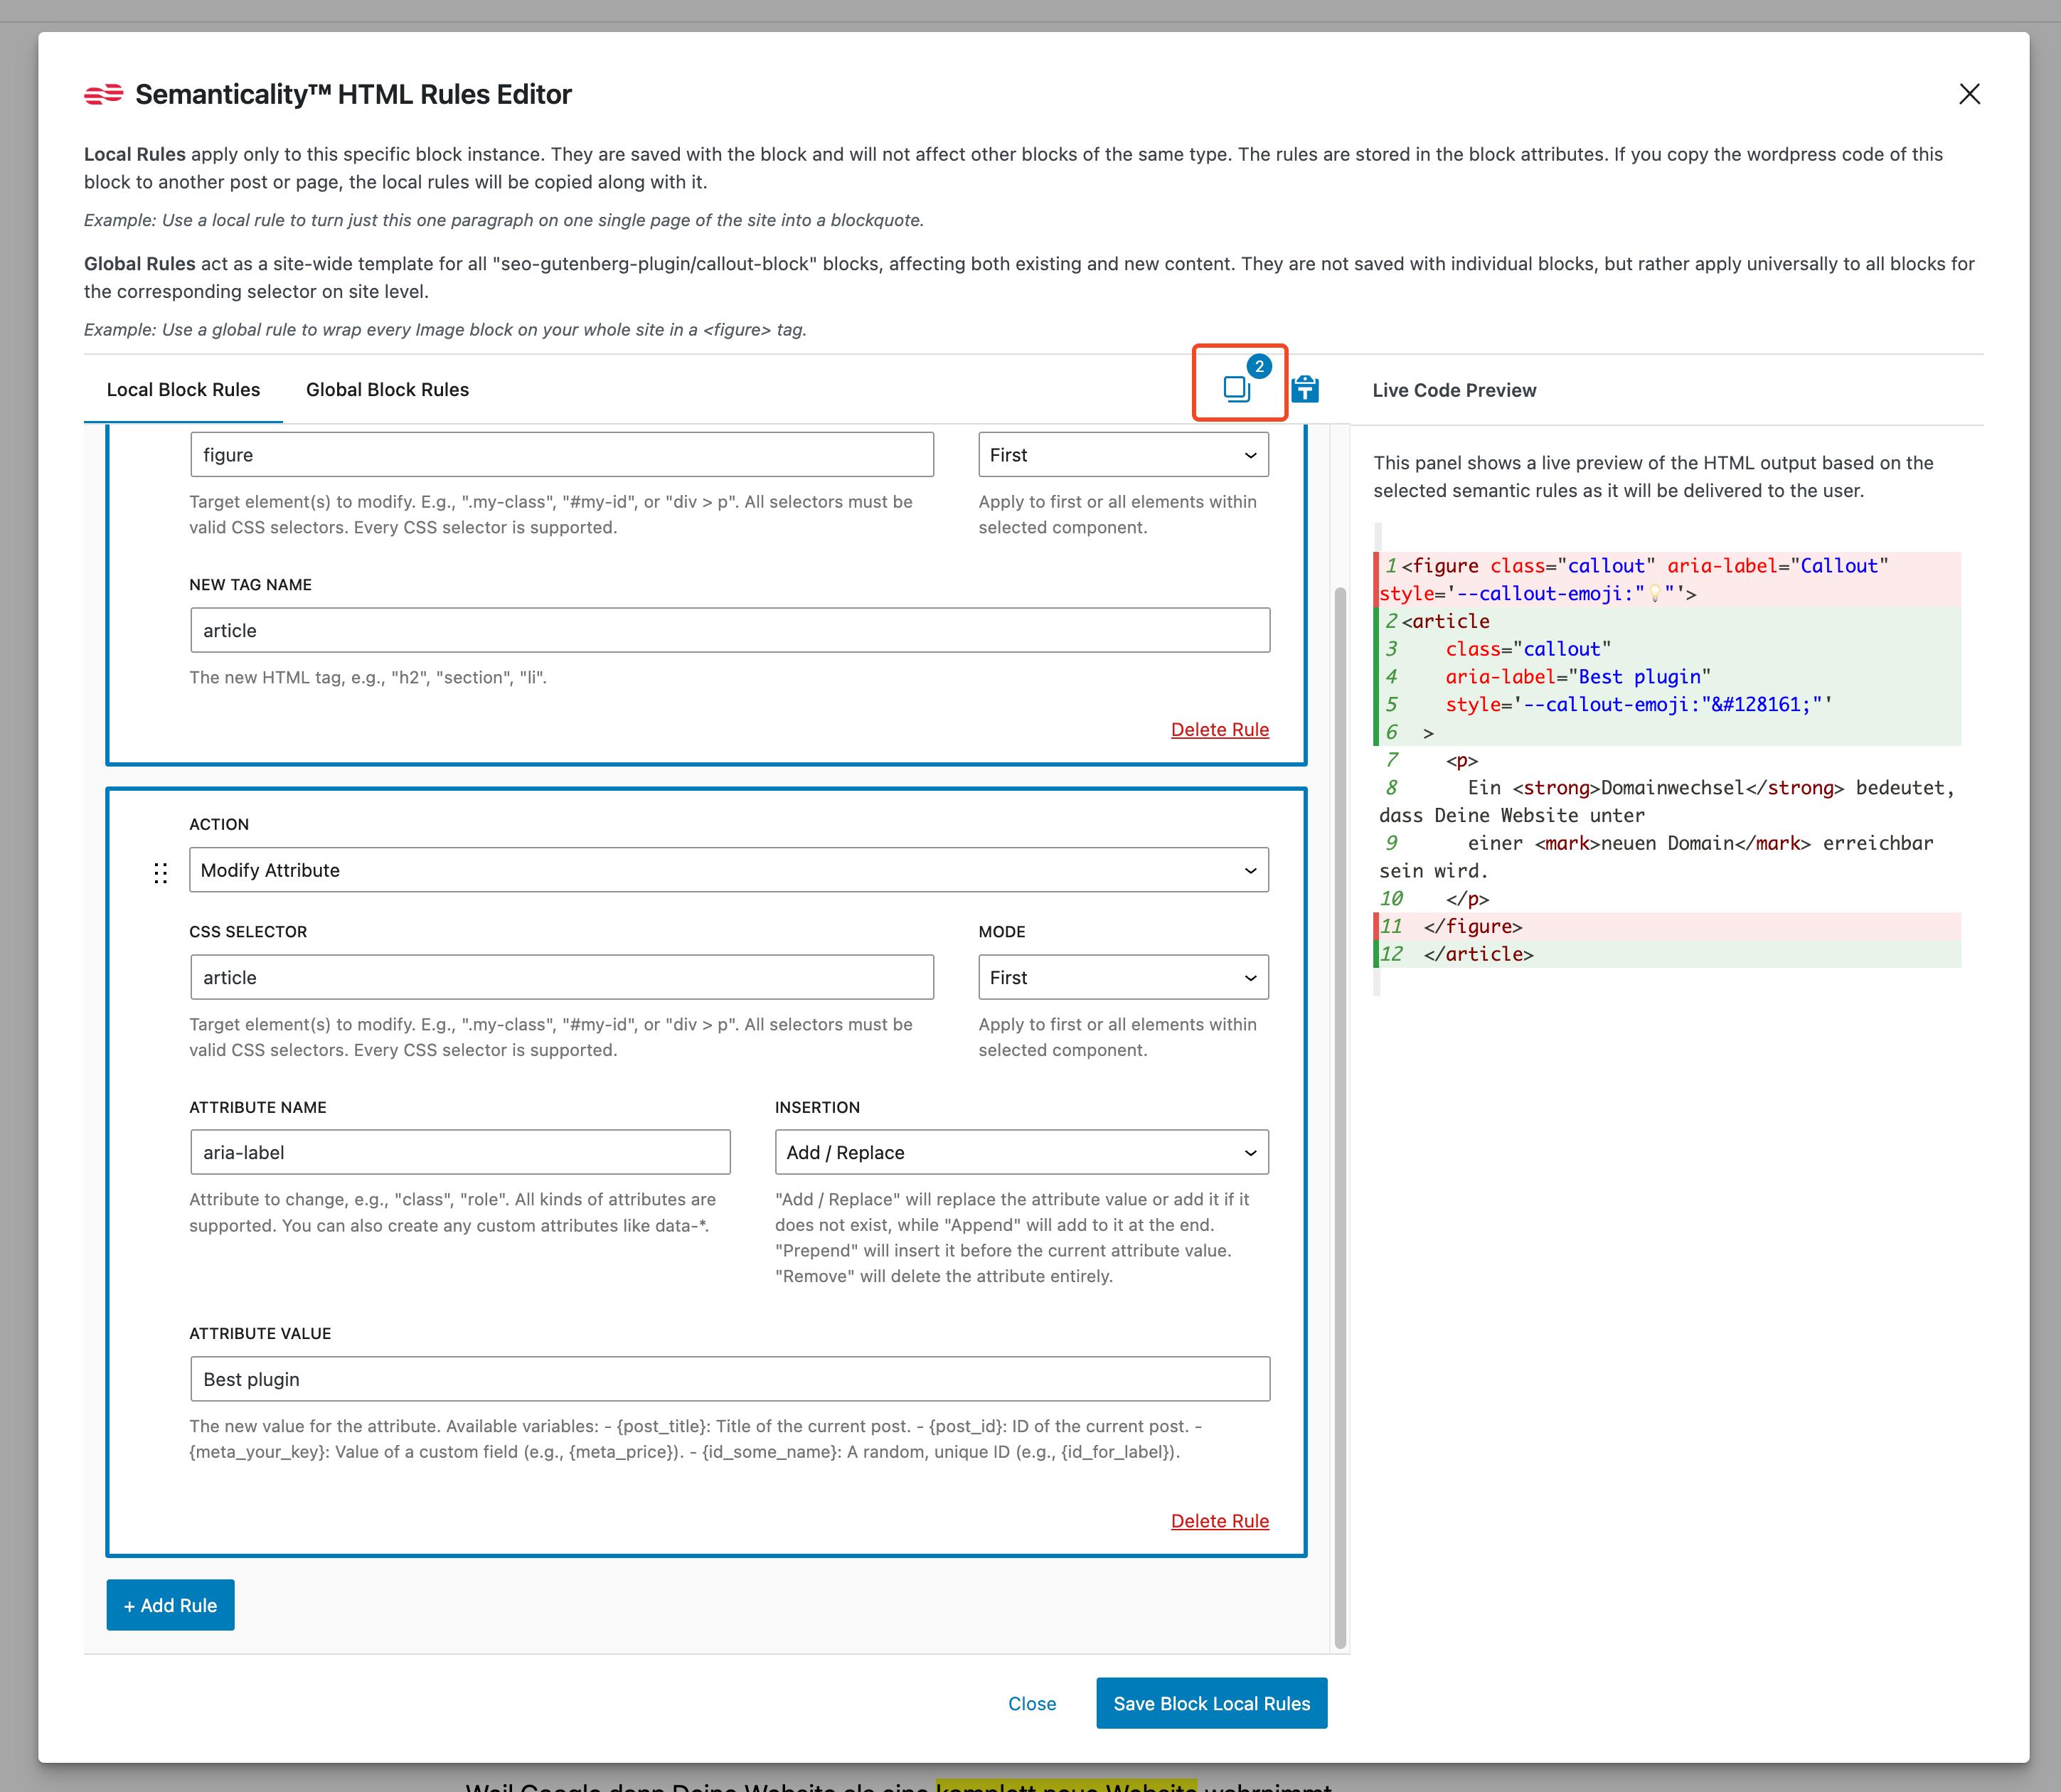
-
Copy the rules. Press
Cmd/Ctrl+Cor the Copy button to copy the selected rules to the clipboard – a JSON package will be copied, for example:{
"type": "semanticality.rules",
"version": 1,
"scope": "local",
"rules": [
{
"actionType": "modifyAttribute",
"selector": "img",
"selectorMode": "querySelectorAll",
"attributeName": "loading",
"insertionMode": "replace",
"value": "lazy"
}
]
} -
Paste the rules. Navigate to the desired location and press
Cmd/Ctrl+Vor the Paste button to paste the rules from the clipboard.
This way, you can easily transfer rules between different posts or sites. Since local rules are stored in the block attributes, when you copy the post code, they are transferred along with the blocks. That is, you can copy the entire post code (three dots → Code Editor) and paste it into another post – the local rules will travel with the blocks.
You can even automatically generate rules in JSON format via chat (e.g., ChatGPT) and paste them into the editor.
Copy/Paste Specifics
- Paste inserts from the clipboard. If the format is not recognized, a prompt to insert manually will appear (in the modal field).
- When pasting, rules are marked as the current tab (local or global).
- Invalid elements are ignored with a notification.
Plugin Behavior with Reusable Blocks and Patterns
Reusable Blocks and Patterns in Gutenberg allow you to reuse sets of blocks across different pages. Semanticality™ supports working with such blocks, but there are some important considerations:
- Local rules in Reusable Blocks: Local rules created within a Reusable Block will apply to all instances of that block on all pages where it is used. This means that if you change local rules in a Reusable Block, these changes will be reflected everywhere that block is inserted.
- Global rules: Global rules created for blocks within Reusable Blocks will work the same as for regular blocks. They will apply to all instances of the corresponding blocks on the site.
- Editing Reusable Blocks: When editing a Reusable Block in a separate window, make sure you save changes for local rules to be updated. After saving the Reusable Block, all pages where it is used will automatically receive the updated rules.
- Editing a Reusable Block on a page: When selecting a Reusable Block on a page, local rules created for that block will appear as already applied, and the rule editing window will be empty. In the Live Code Preview, you will already see the changes made by the Reusable Block's local rules when it was created in a separate window. On the post editing page, you can add new local rules that will apply directly to this instance of the Reusable Block.
- Patterns: Patterns in Gutenberg are pre-defined sets of blocks. Semanticality™ will work with blocks within patterns in the same way as with regular blocks. Local rules created within a pattern will only apply to those instances of the pattern that have been inserted onto the page.
Thus, you can use Semanticality™ to improve the semantics and accessibility in both Reusable Blocks and Patterns, ensuring consistency and ease of rule management across your entire site.
Using Reusable Blocks, you can make local rules global for all pages where that block is used. This is especially useful for frequently used components such as accordions, tabs, buttons, etc.
Most Important Plugin Usage Points
Here's a summary of the most important points to remember when working with Semanticality™:
- The last (bottom of the list) rule for the same attribute takes precedence.
- Rule selection: Shift — range, Cmd/Ctrl — add/remove, hotkeys work.
- Parent preview shows children with their rules applied; you can override them in the parent.
- If you exit without saving the post, local rules will be reset.
- Global rules will apply everywhere immediately — even without saving the post.
- A very large number of local rules can significantly burden the editor.
- Copying the post code also transfers local rules — useful for migration/testing.
- After saving rules, Live Preview rebuilds the database and shows the diff from the new state.
- Never forget to test changes on a staging or local version of the site – you don't need to purchase a separate license for them.
Most Common Use Cases
Here are a few common scenarios and how to implement them using Semanticality™:
- Change Tag: Change Tag → CSS Selector → New Tag Name.
- Add Class: Modify Attribute →
class→ Append →my-class. - Remove Role: Modify Attribute →
role→ Remove. - First/All Elements: Mode = First / All.
- ID + ARIA: for heading
id: {id_title}, for buttonaria-labelledby: {id_title}.
Most Common Errors
Some errors can cause rules not to work as expected. Here's what to look out for:
- Empty selector → the rule will not execute.
- Non-existent attribute + Append/Prepend → the plugin will correctly create the attribute (along with the separator), but verify that this is truly needed.
- Too general a selector in Global (e.g.,
*) can affect many places. Narrow down the scope.
Debugging Tips
If something goes wrong, here are some debugging tips:
- Start locally. Test the rule on a single block, then transfer it to global rules.
- Look at Live Preview. It immediately shows which line was added/changed/deleted.
- Use variables (
{post_title},{meta_*},{id_*}) — this is convenient and eliminates manual IDs. - Don't be afraid of complex selectors, but avoid "redundant" ones – they are harder to read and maintain.
Practical Scenarios (Kadence + Core)
This section provides examples of real-world tasks and solutions. Each example is presented as a set of rules that can be configured in the editor. Set them in the Local tab for testing, then transfer them to Global if needed.
Kadence Accordion → semantic list
Block: kadence/accordion and child kadence/pane.
Goal: To make the accordion perceived as a semantic list with headings, to improve content accessibility and perception and meet the requirements of WCAG 2.2 1.3.1. "Info and Relationships". To do this, you need to:
-
For
kadence/accordionglobally:- Replace
div.kt-accordion-inner-wrapwith<ul>. - Replace
div.wp-block-kadence-panewith<li>. - Add
aria-label="FAQ - Frequently Asked Questions"attribute to.kt-accordion-header-wrap.
- Replace
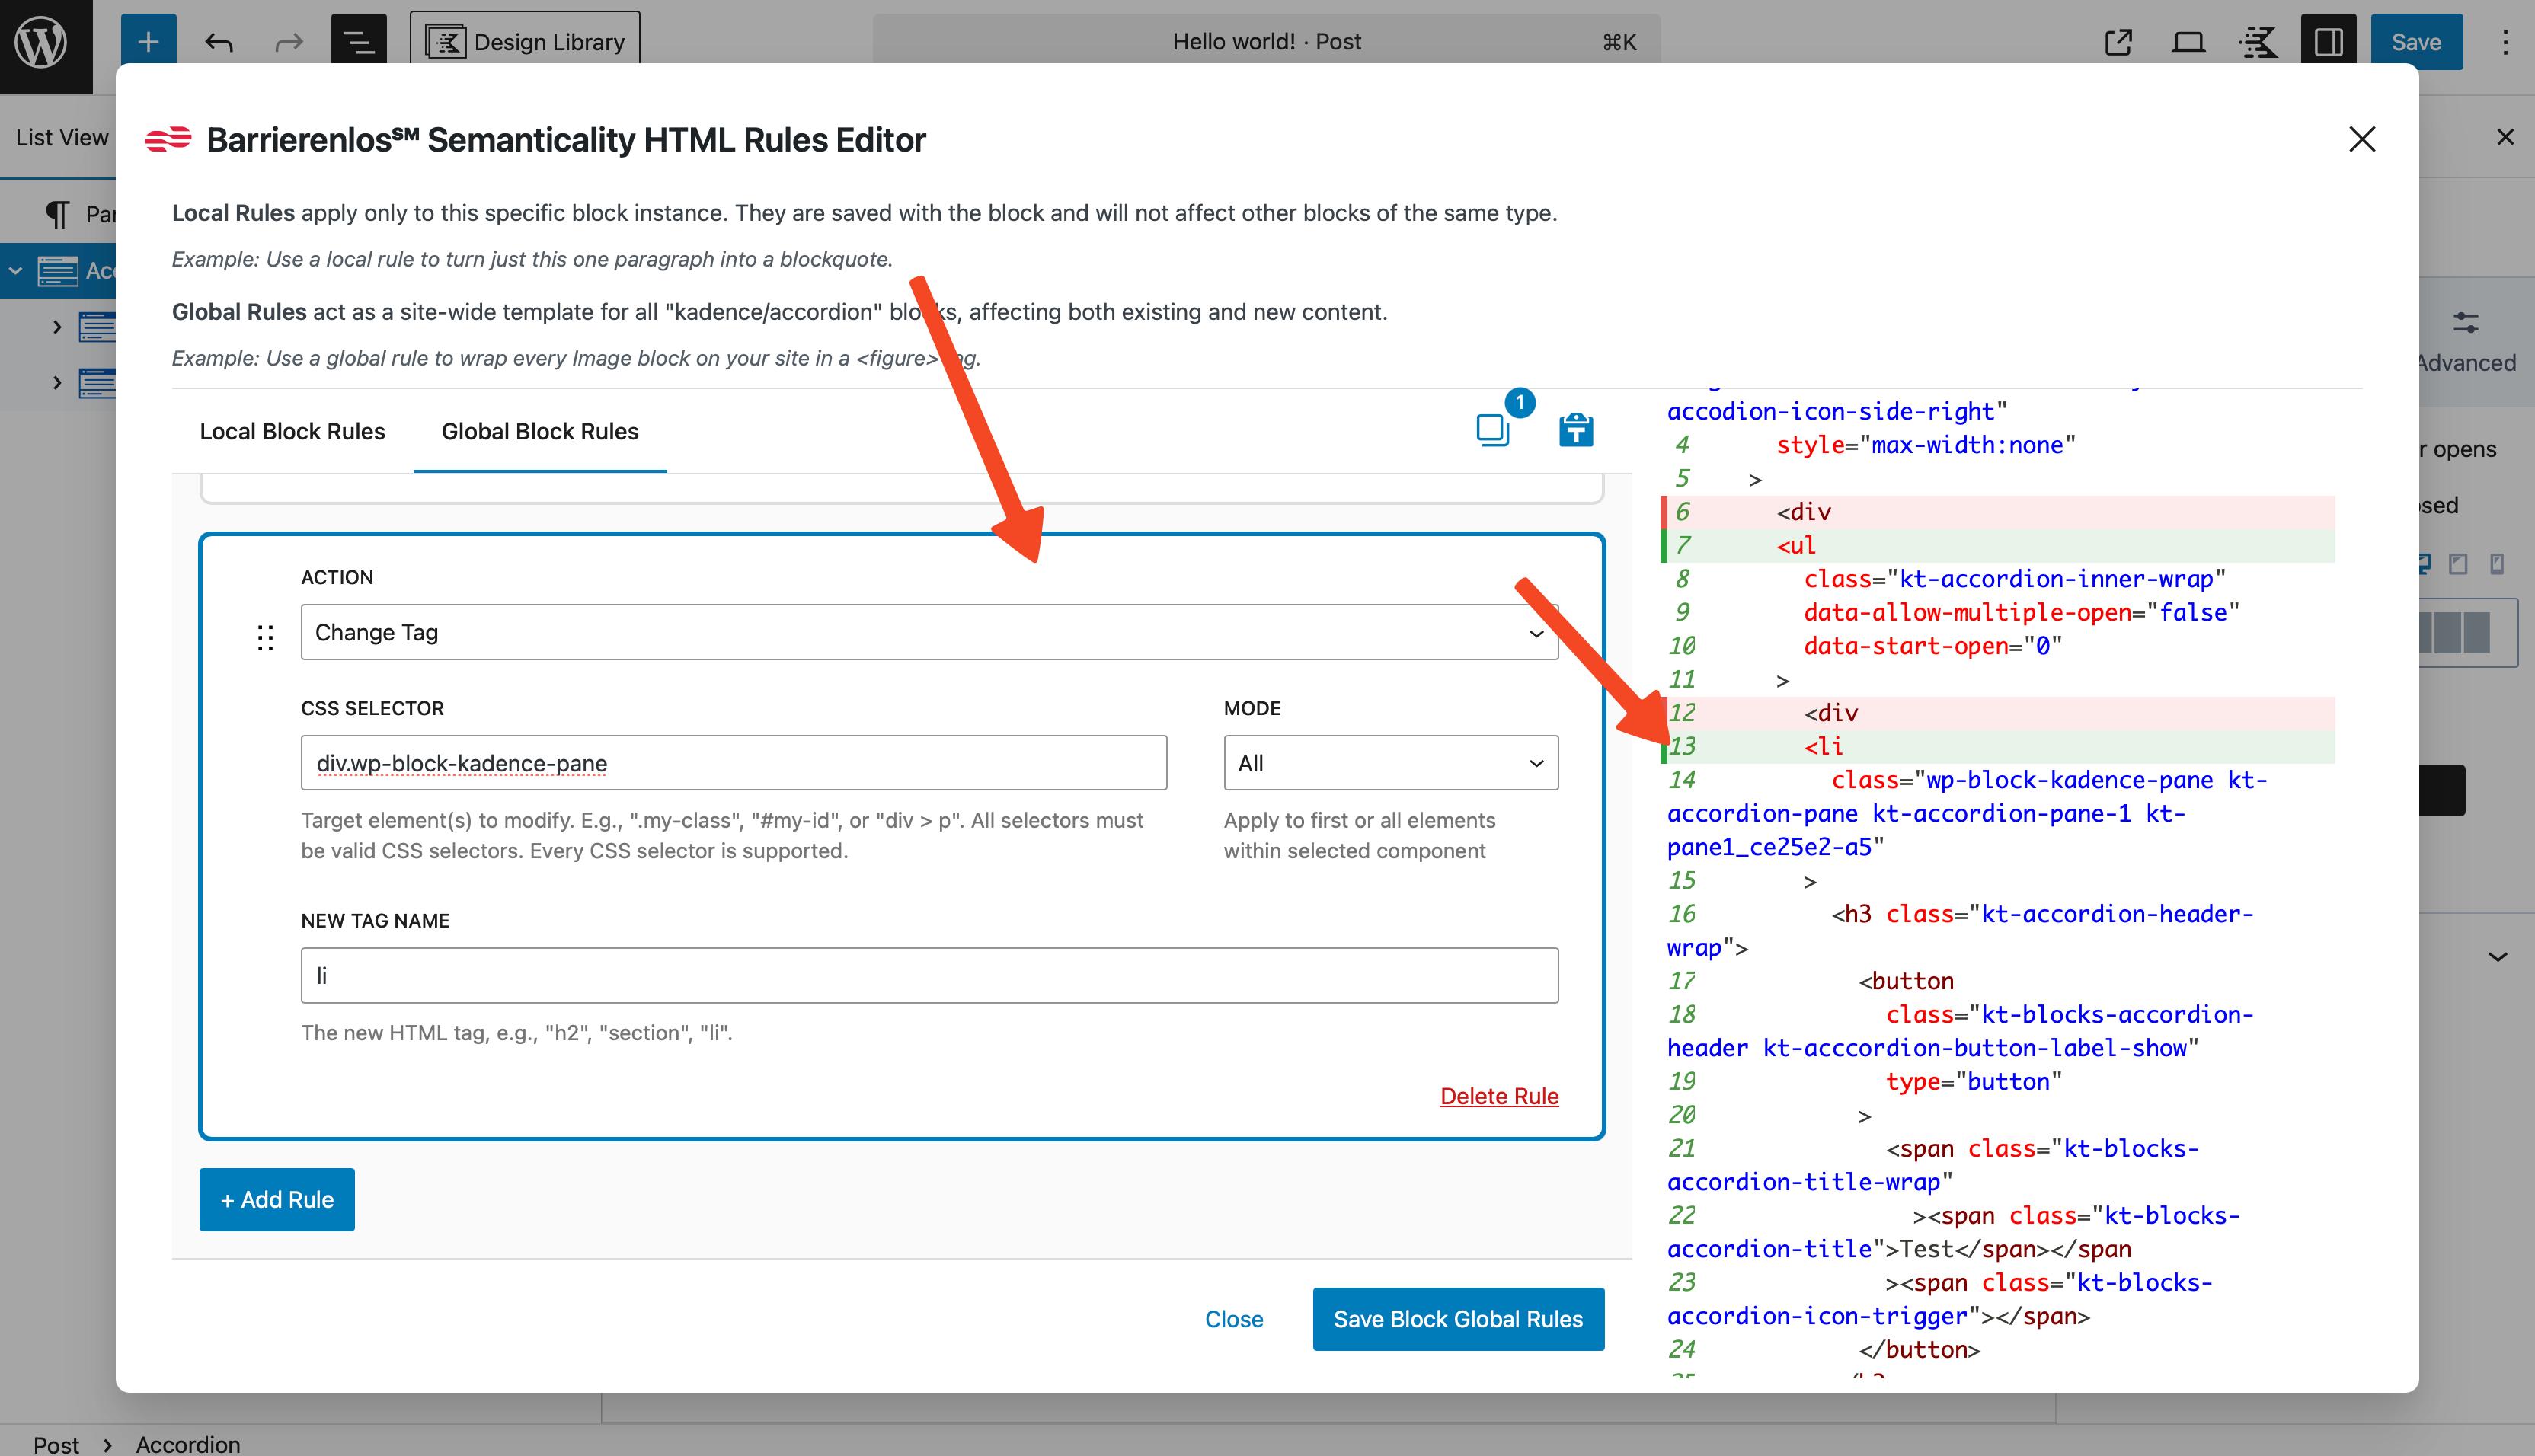
-
For
kadence/pane:- Replace
.kt-accordion-header-wrapwith<h3>.
- Replace
Result: Screen readers perceive the accordion as a list of sections with headings, which significantly enhances accessibility. Here's how we can achieve this using the Semanticality™ rules editor:
For kadence/accordion (global)
First, let's create three global rules for kadence/accordion. We'll make them global immediately so these rules apply to all instances of this block across the site, avoiding the need to create new rules for each instance.
- Create a rule with Action "Change Tag"
- CSS Selector:
div.kt-accordion-inner-wrap - Mode: First
- New Tag Name:
ul
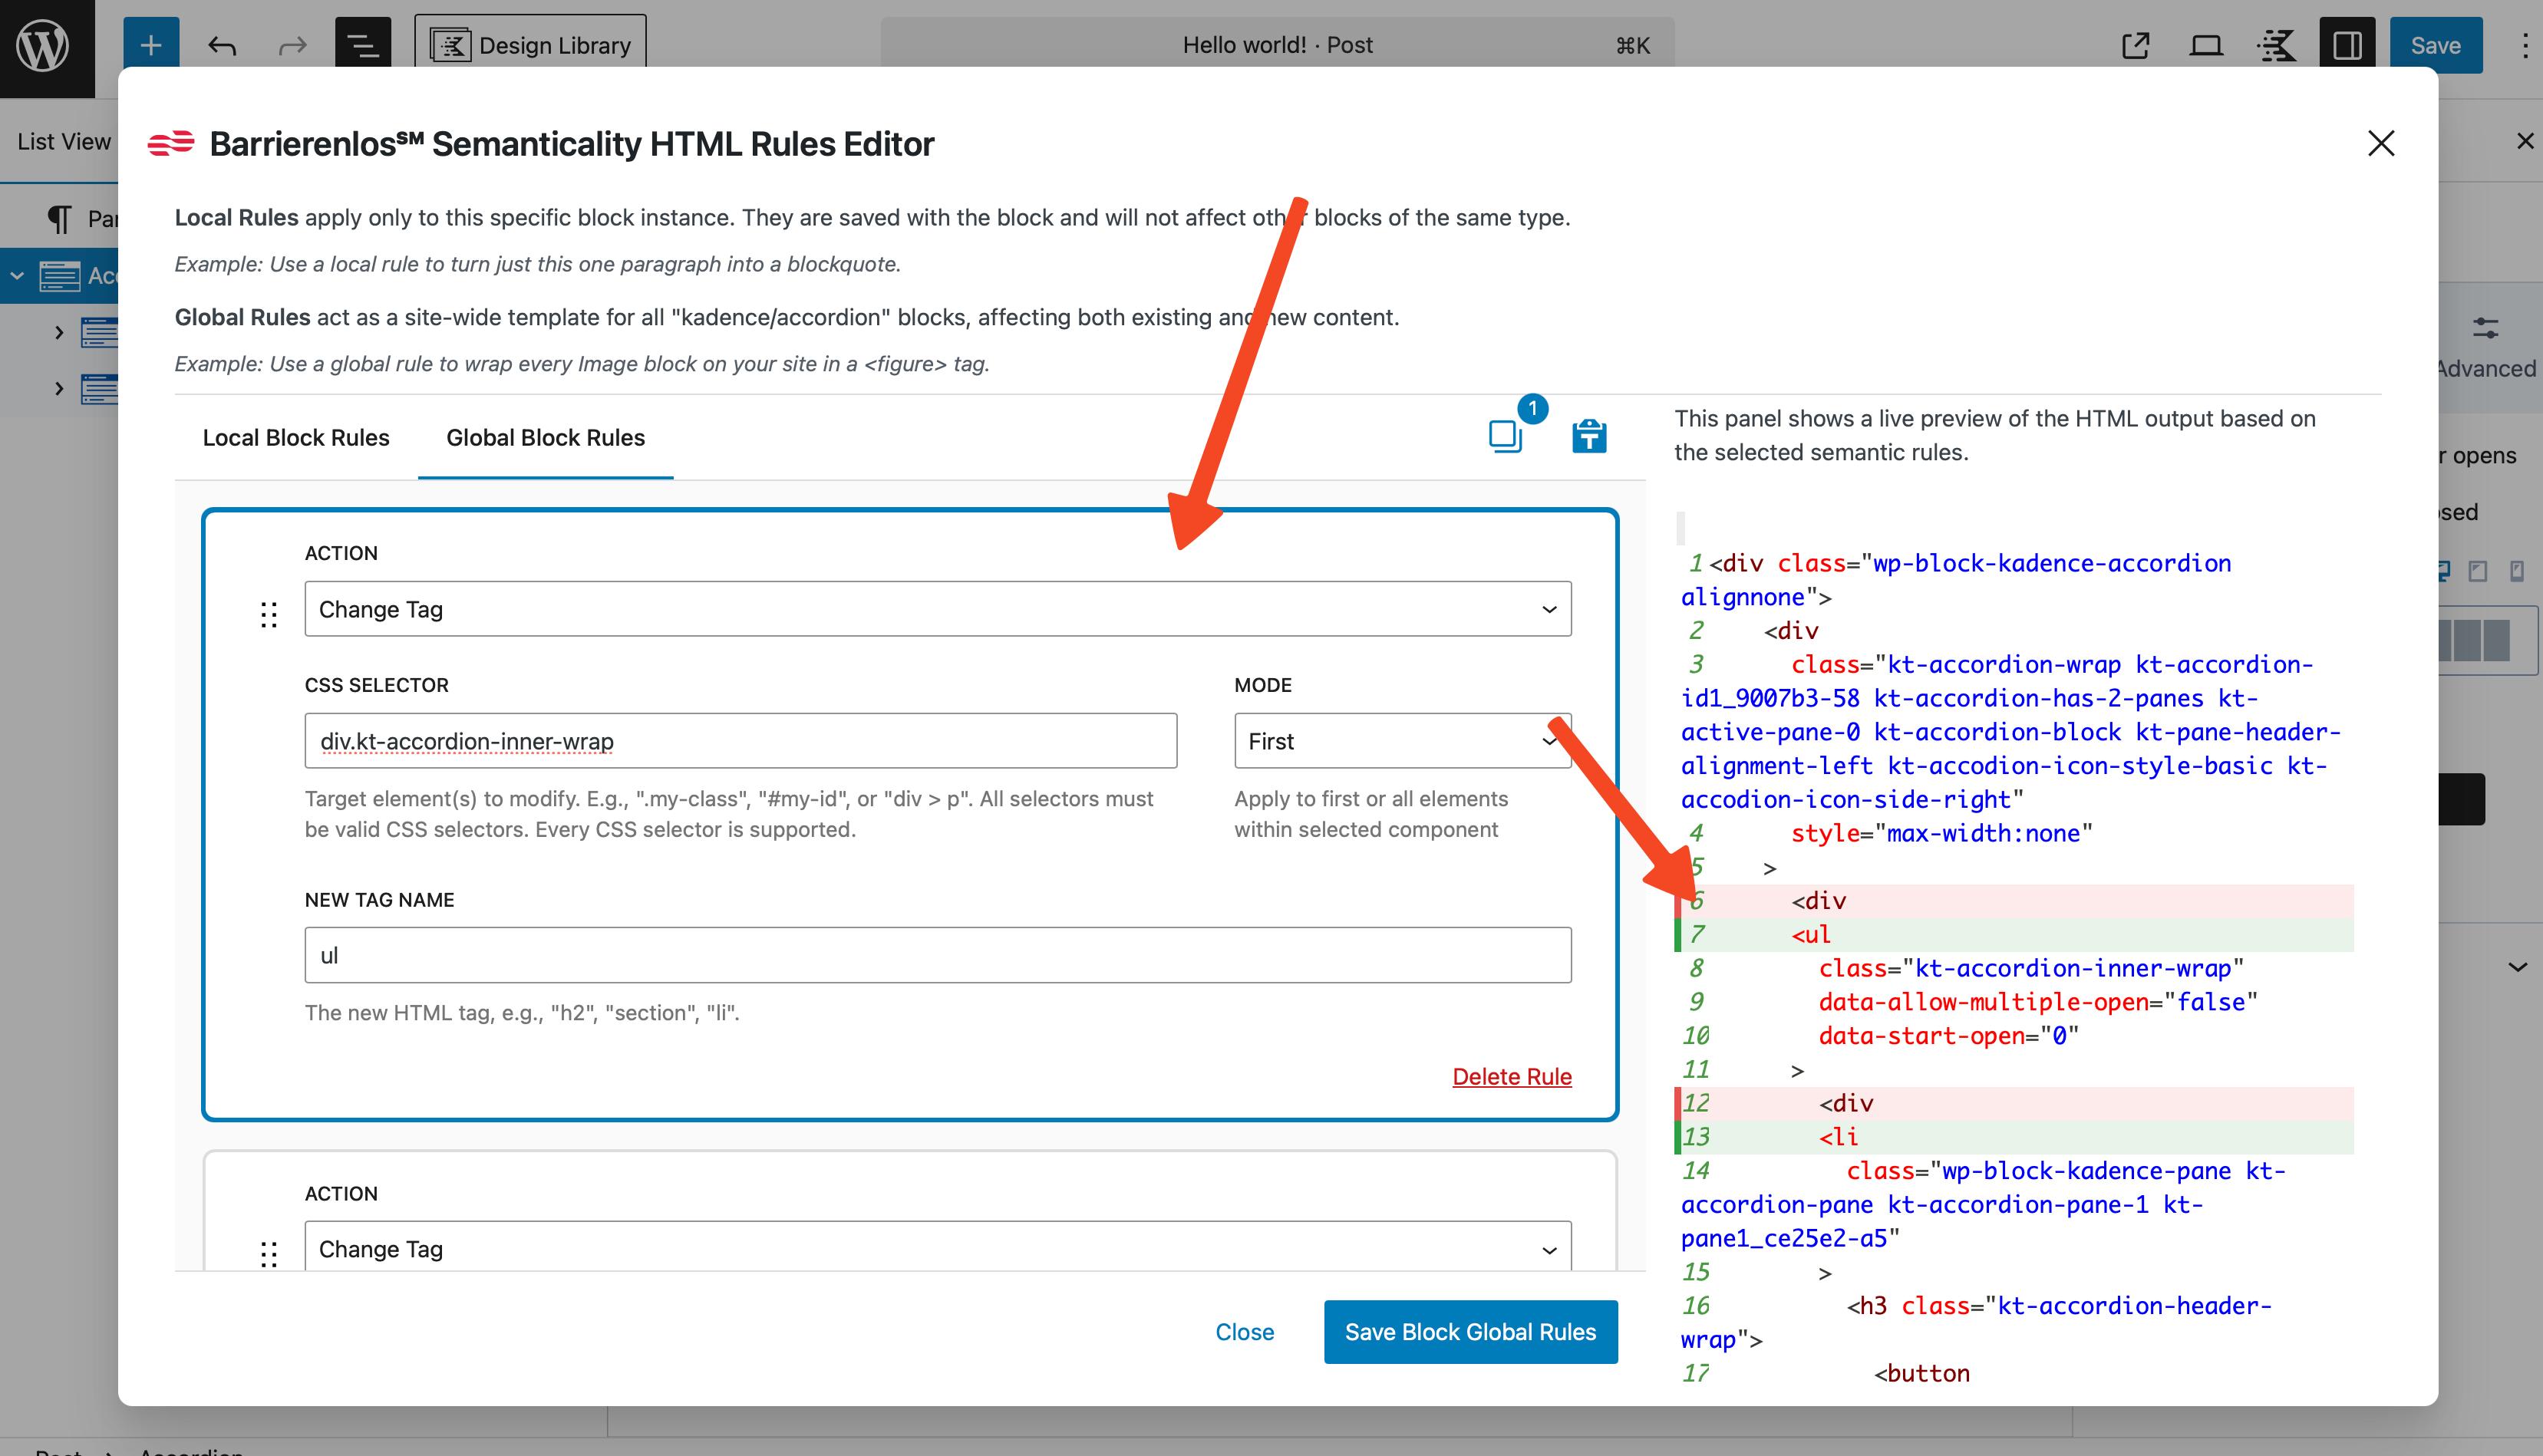
- Create a rule with Action "Change Tag"
- CSS Selector:
div.wp-block-kadence-pane - Mode: All
- New Tag Name:
li
- Create a rule with Action "Modify Attribute"
- CSS Selector:
.kt-accordion-header-wrap - Mode: First
- Attribute Name:
aria-label - Insertion: Add / Replace
- Value:
FAQ - Frequently Asked Questions
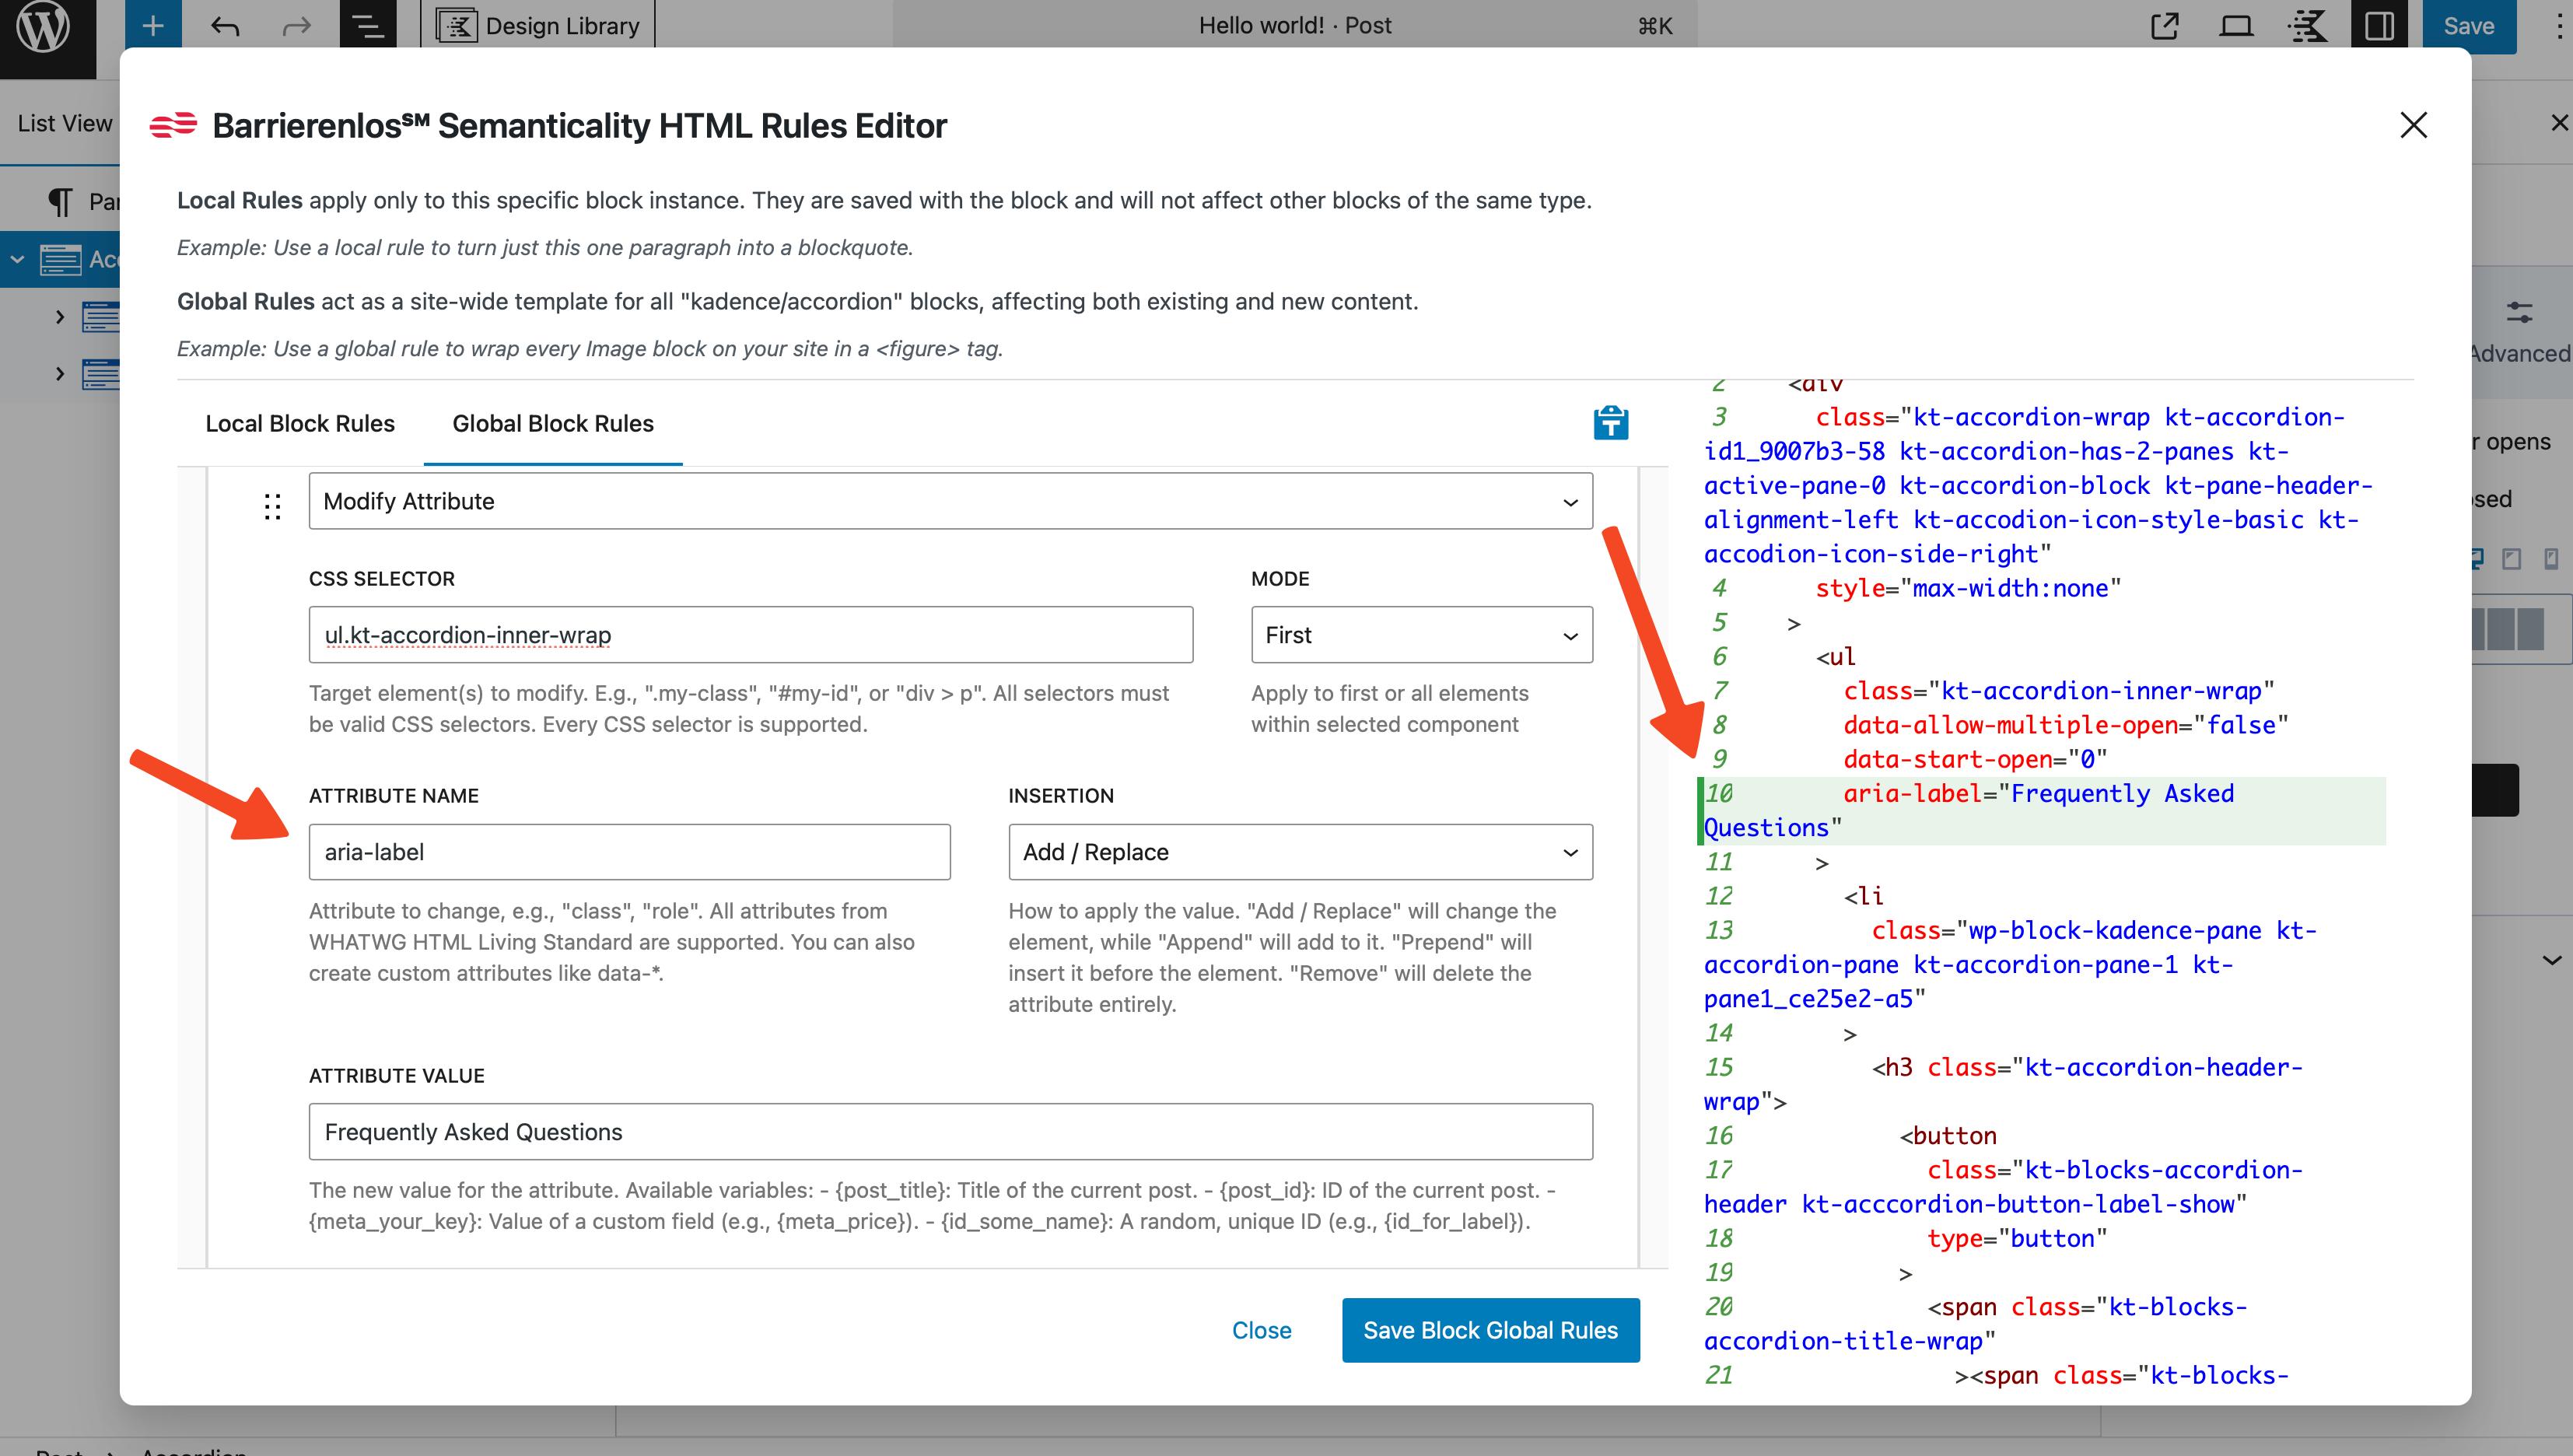
Now all kadence/accordion blocks are lists and contain li elements. We also added the aria-label attribute to inform screen readers that this is an accordion with questions and answers.
For kadence/pane (global)
Next, let's set up rules for kadence/pane. Again, we'll make them global so that these rules apply to all instances of this block across the site, eliminating the need to create new rules for each instance.
- Create a rule with Action "Change Tag"
- CSS Selector:
.kt-accordion-header-wrap - Mode: First
- New Tag Name:
h3
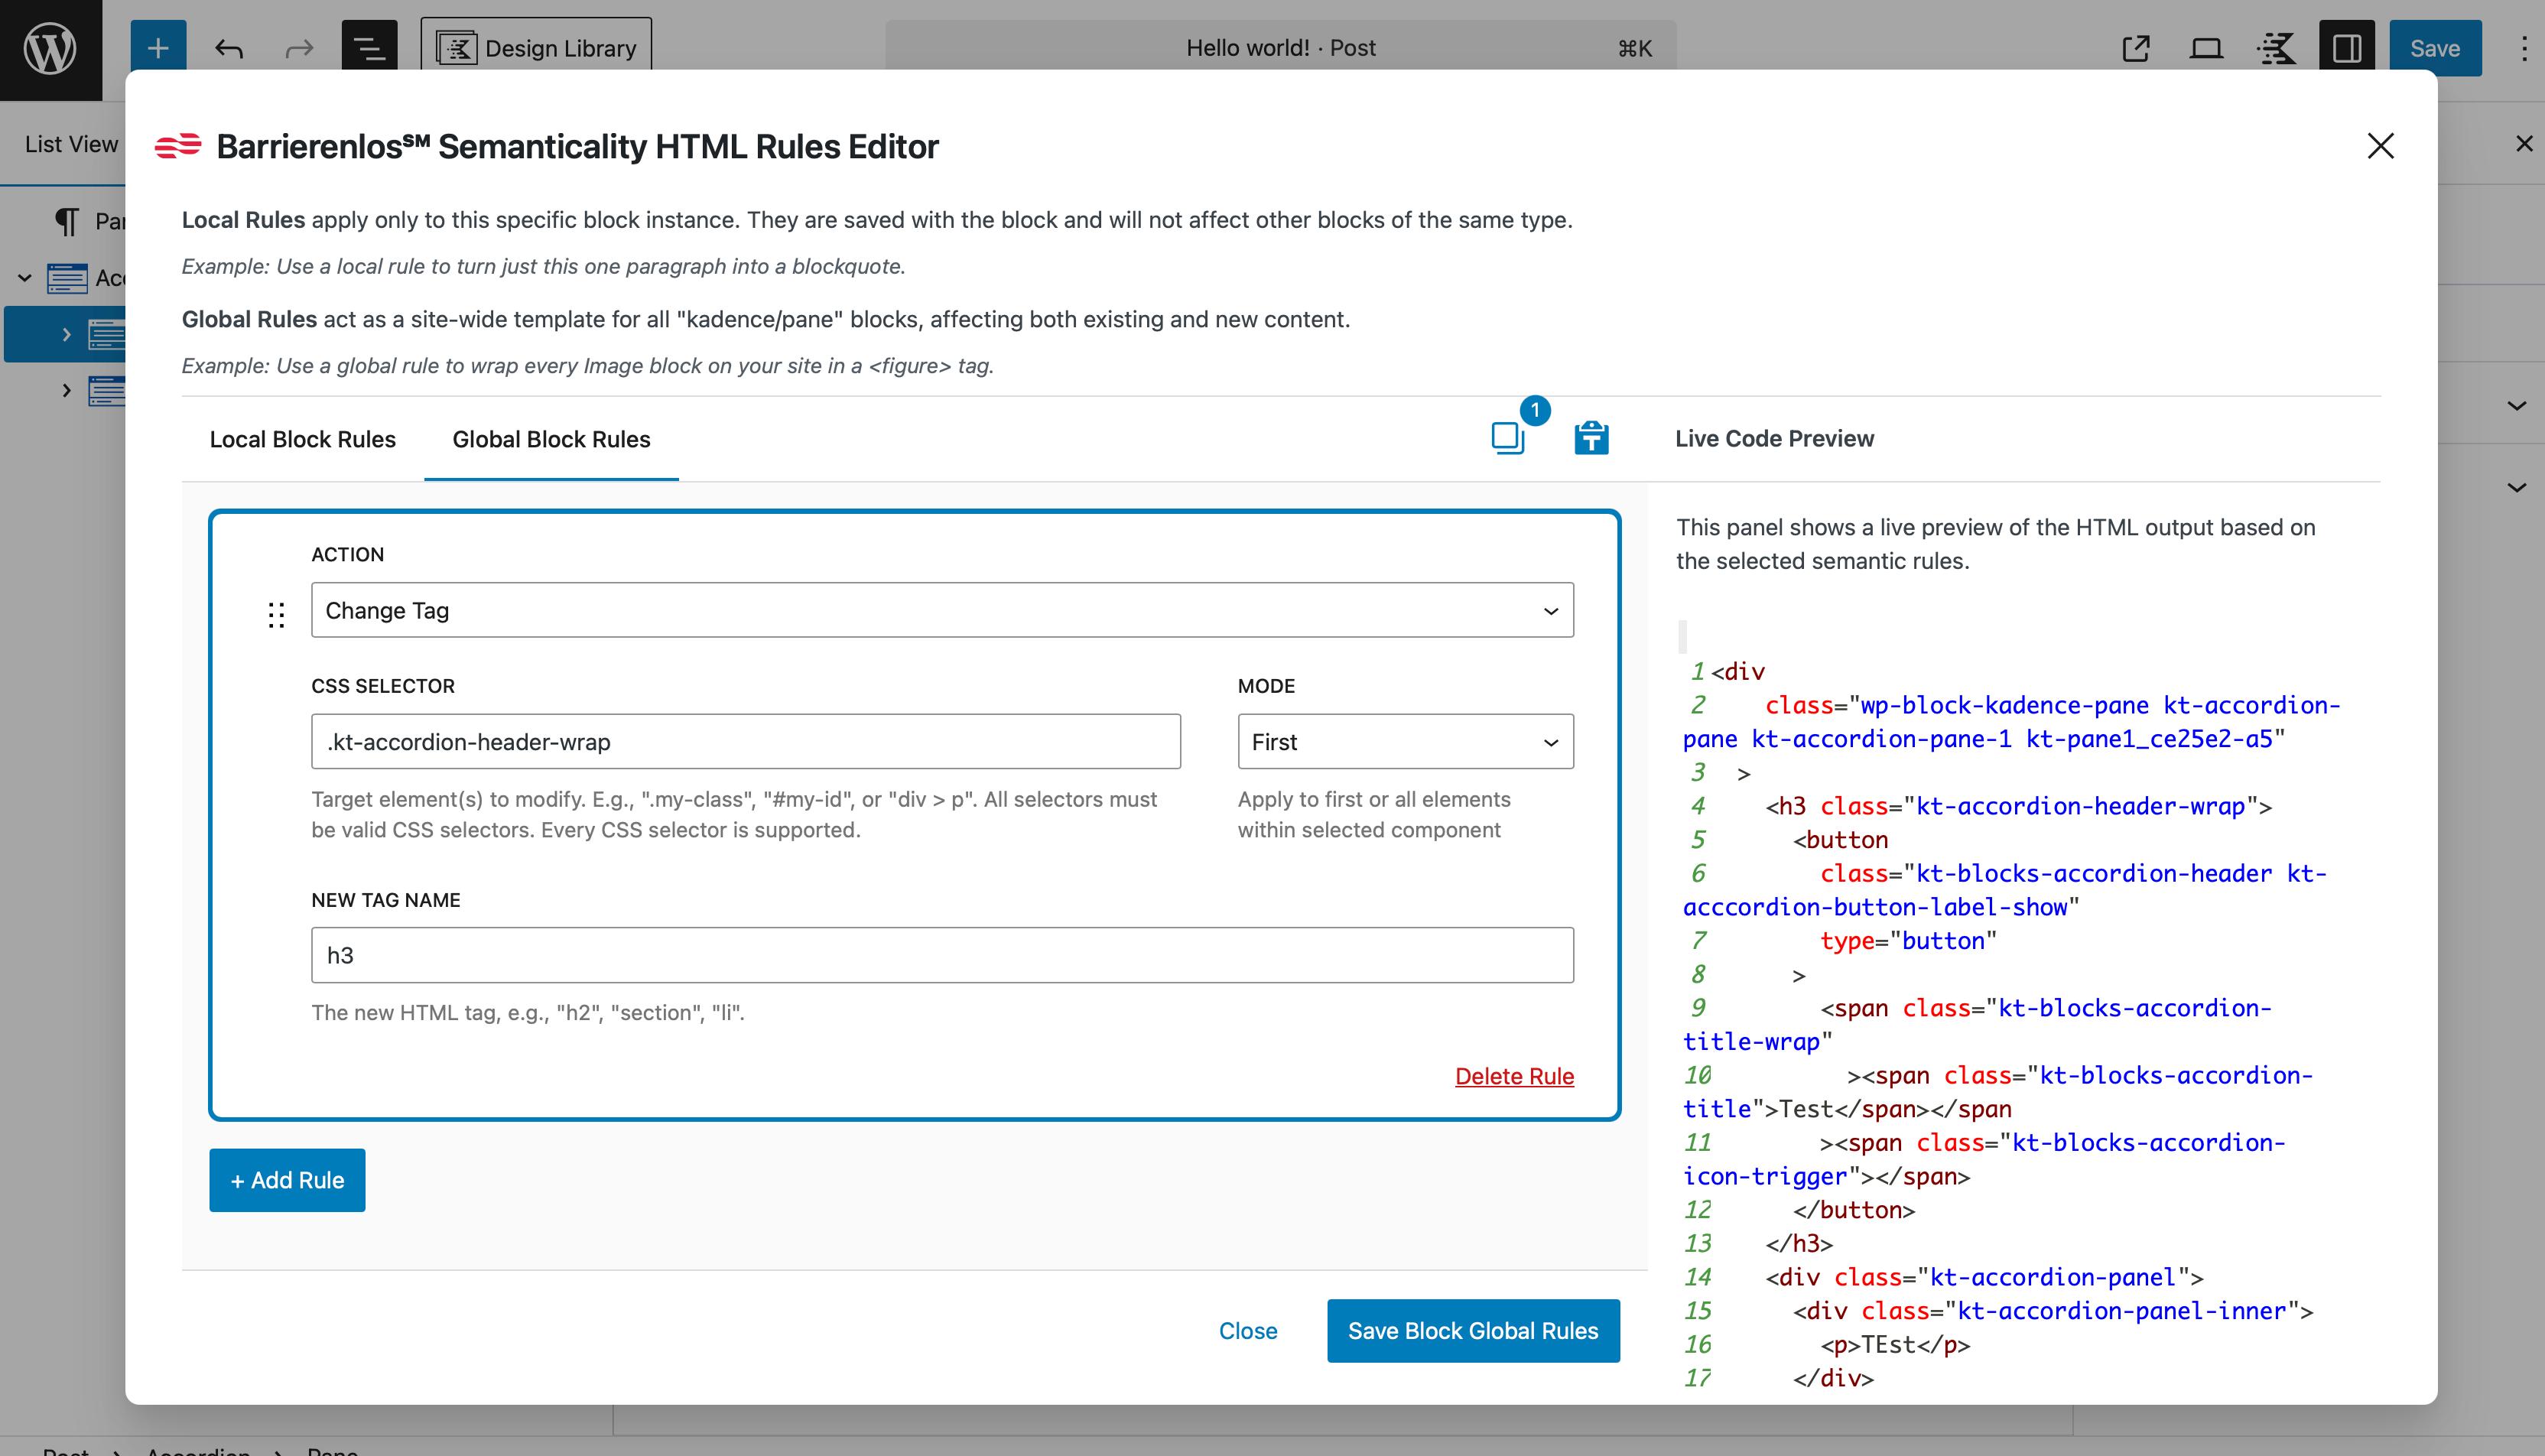
Now all headings in kadence/pane are third-level headings, and screen reader users can quickly navigate the content structure through the headings menu.
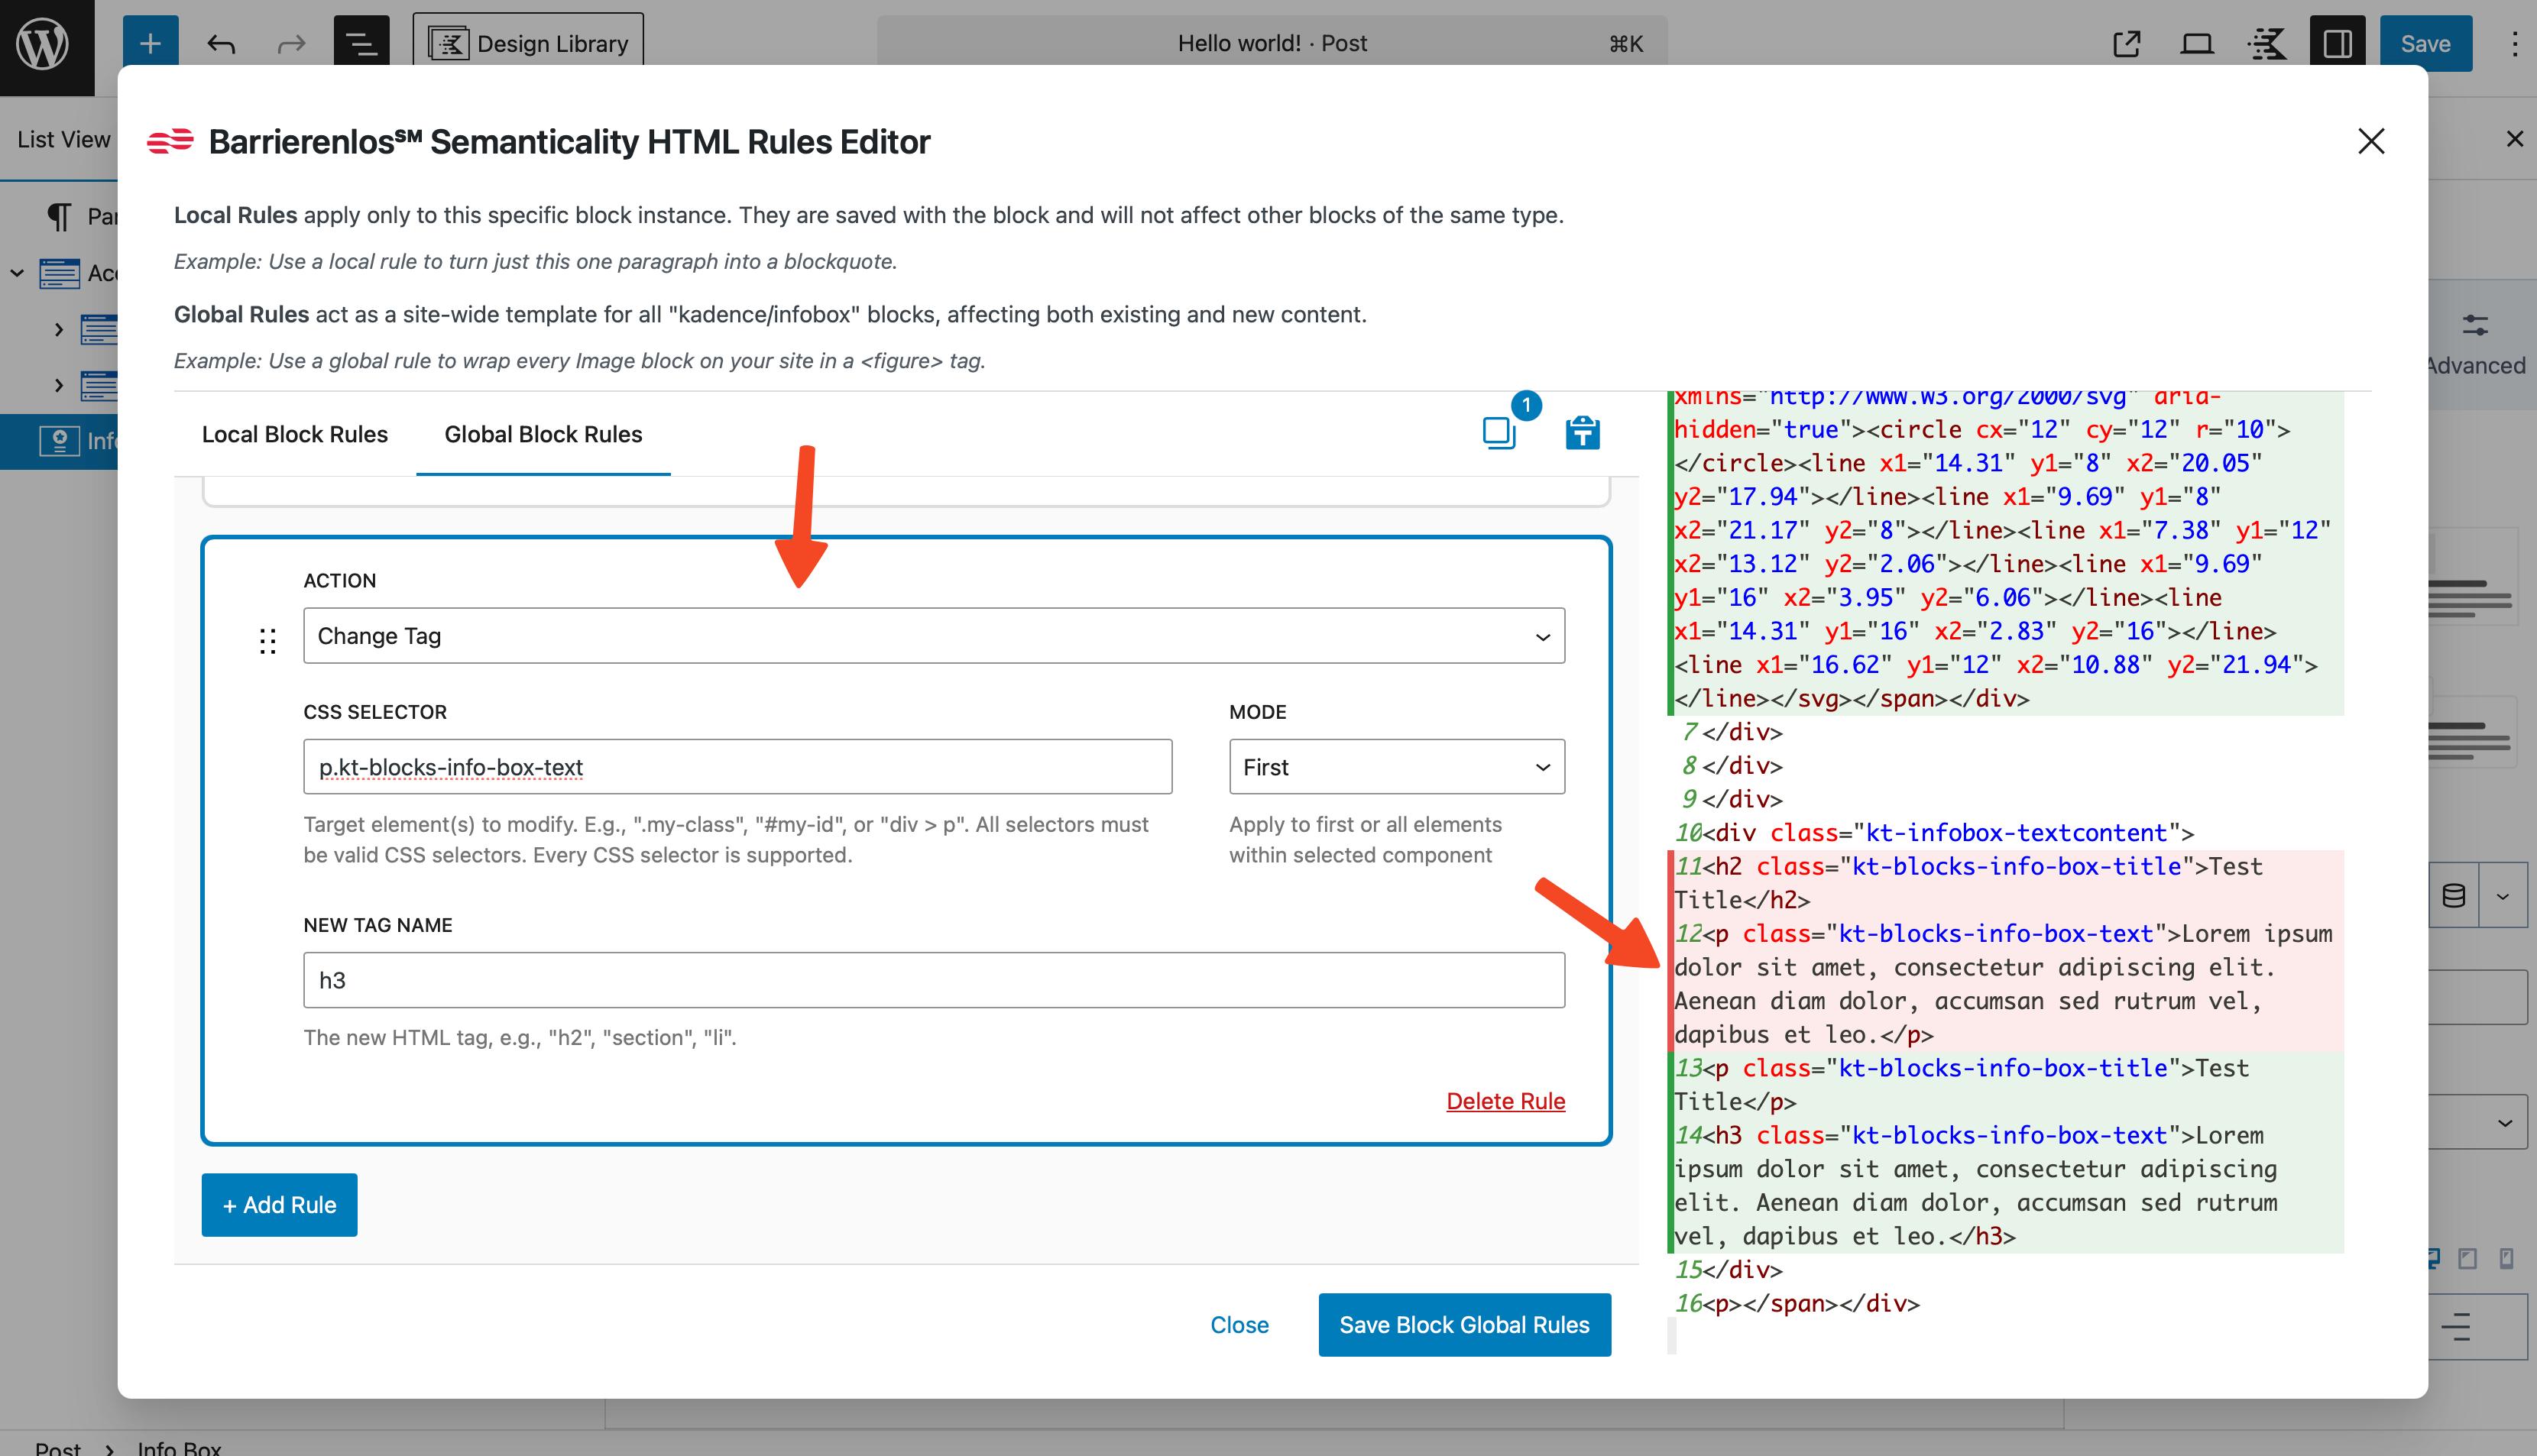
Kadence InfoBox: Swap Heading and Text
Block: kadence/infobox
Goal: To swap the heading and text, so that the text is in <h3> and the heading in <p>. This will improve the heading hierarchy on the page and make the content more logical, fulfilling the requirements of WCAG 2.2 2.4.10 "Section Headings."
- Create a rule with Action "Change Tag"
- Selector:
.kt-blocks-info-box-title - New Tag Name:
p

- Create a rule with Action "Change Tag"
- Selector:
p.kt-blocks-info-box-text - New Tag Name:
h3
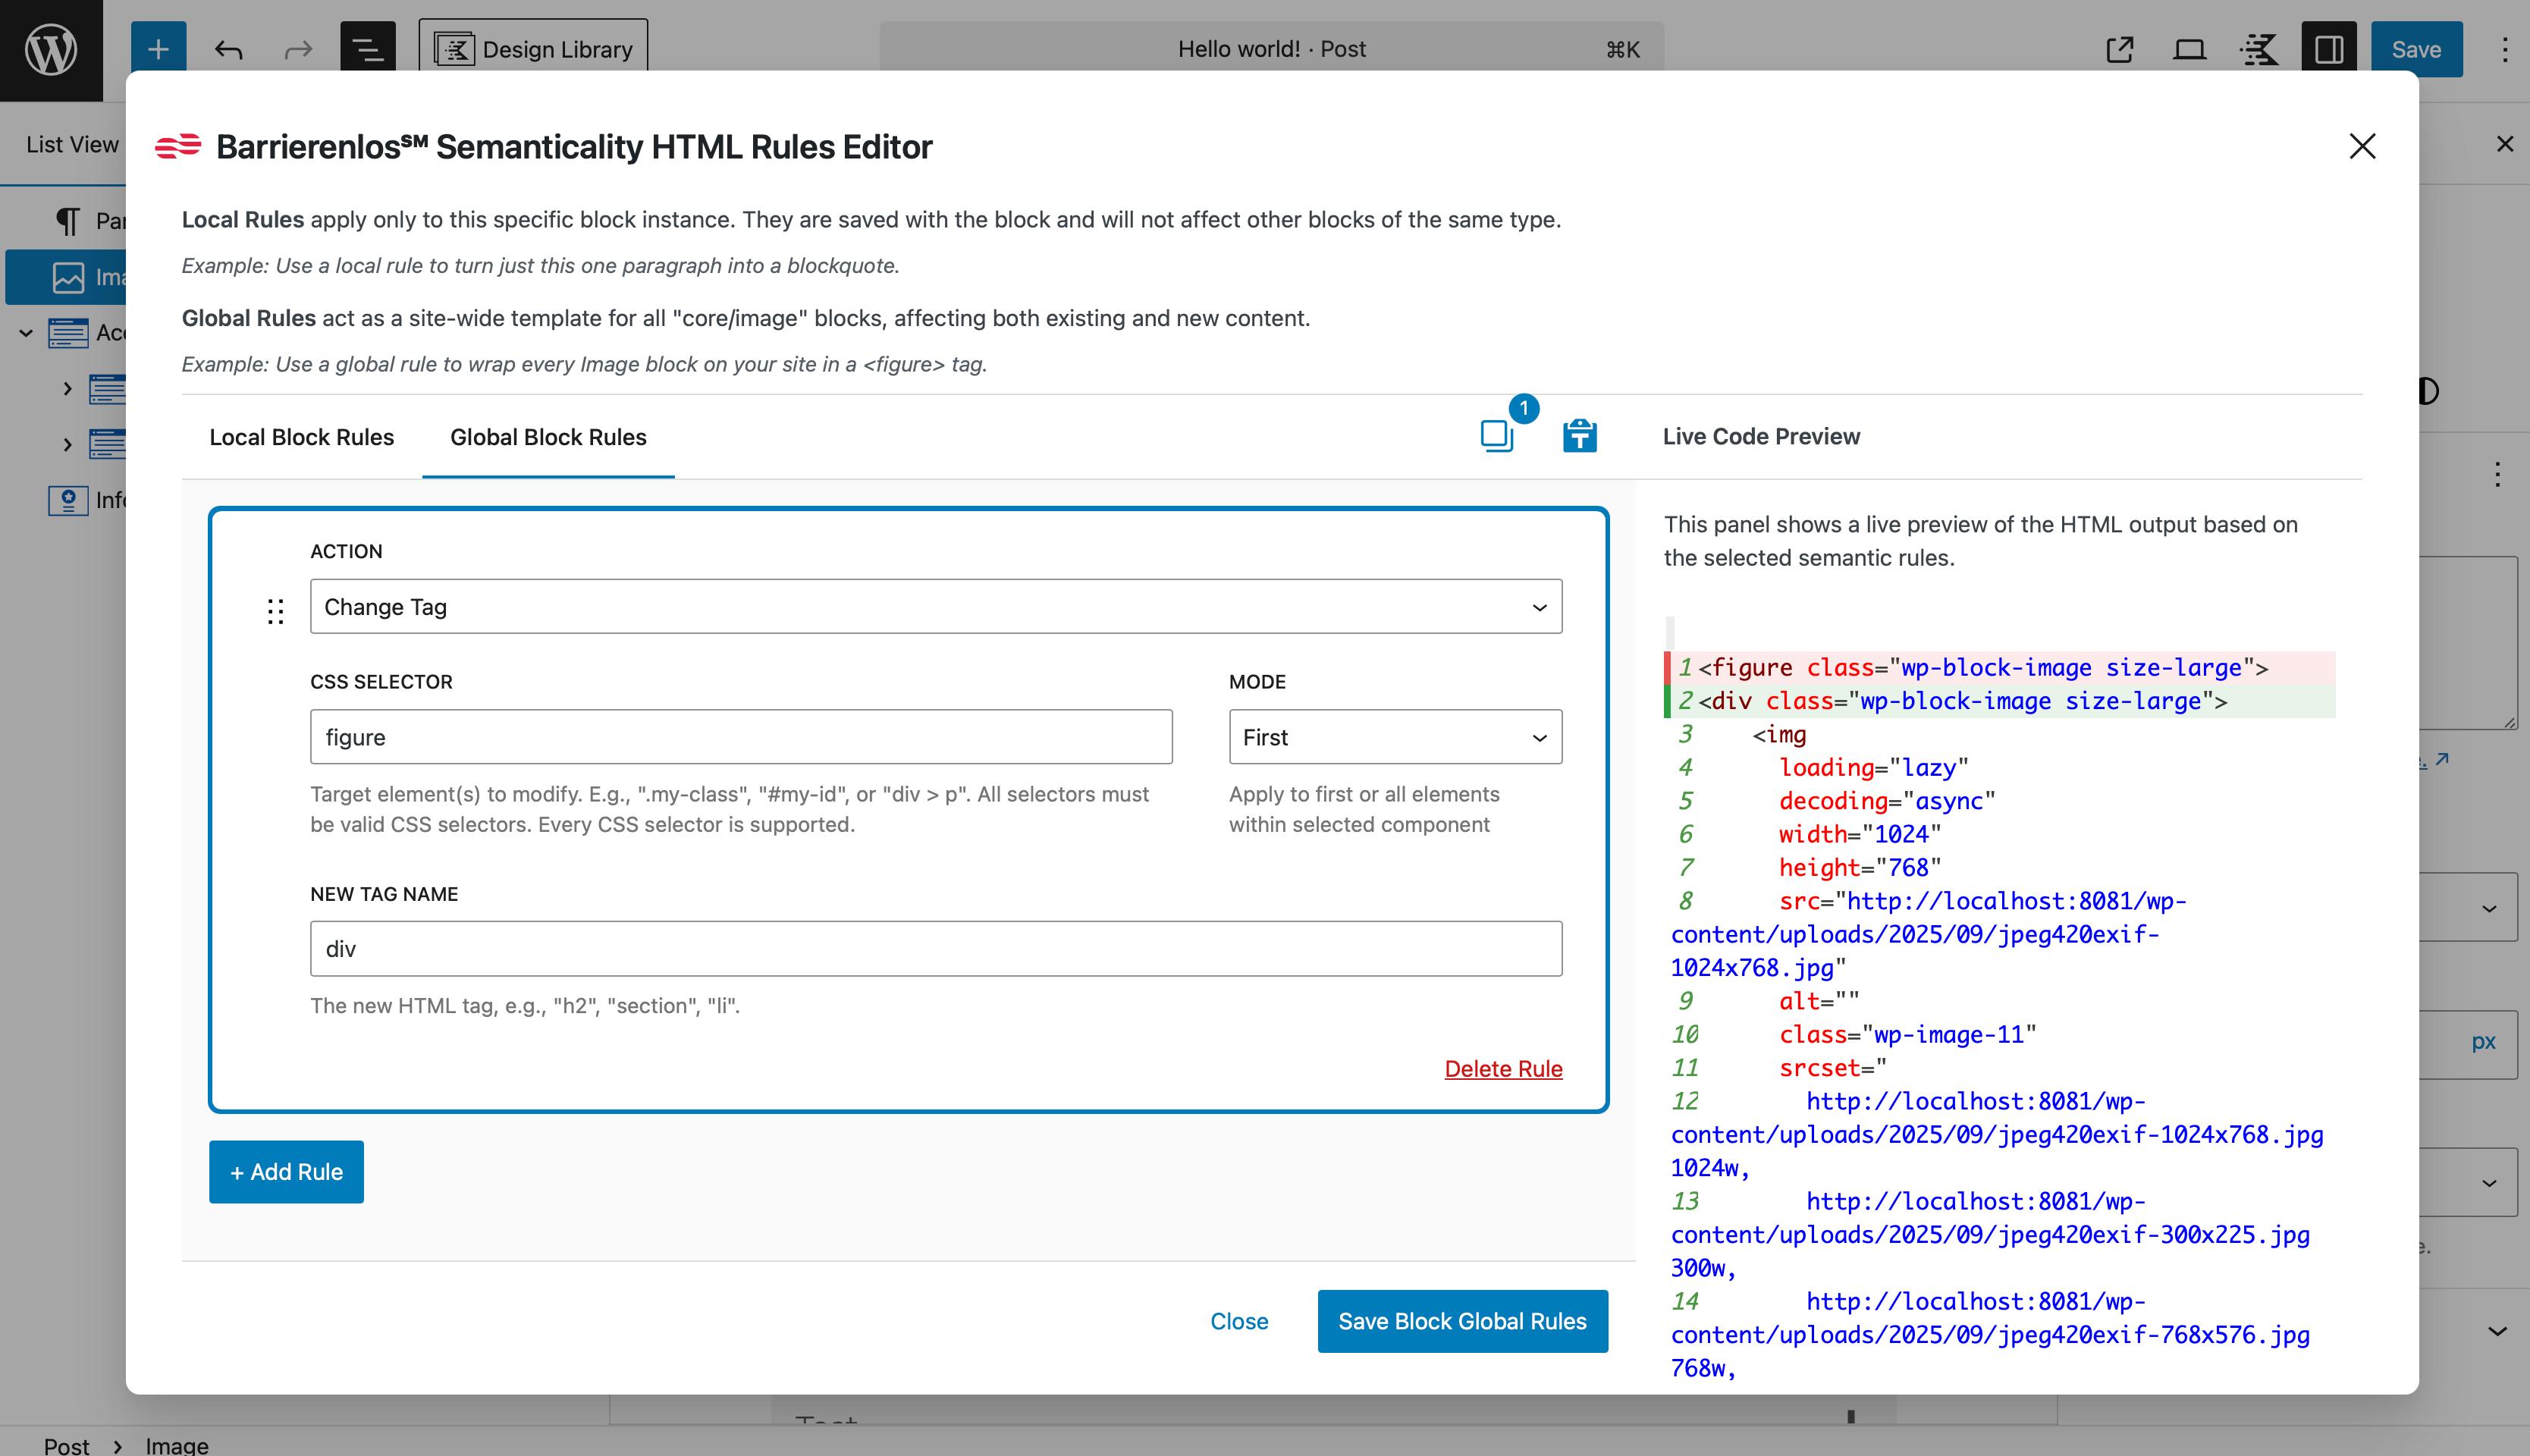
Core Image: Replace <figure>/<figcaption>
Block: core/image
Goal: In this scenario, we will replace semantic elements with simpler ones to streamline the HTML structure. It is not always necessary to use <figure> elements if they are not referenced in the text or if they do not contain significant content.
- Create a rule with Action "Change Tag"
- Selector:
figure - New Tag Name:
div
- Create a rule with Action "Change Tag"
- Selector:
figcaption - Mode: All
- New Tag Name:
small
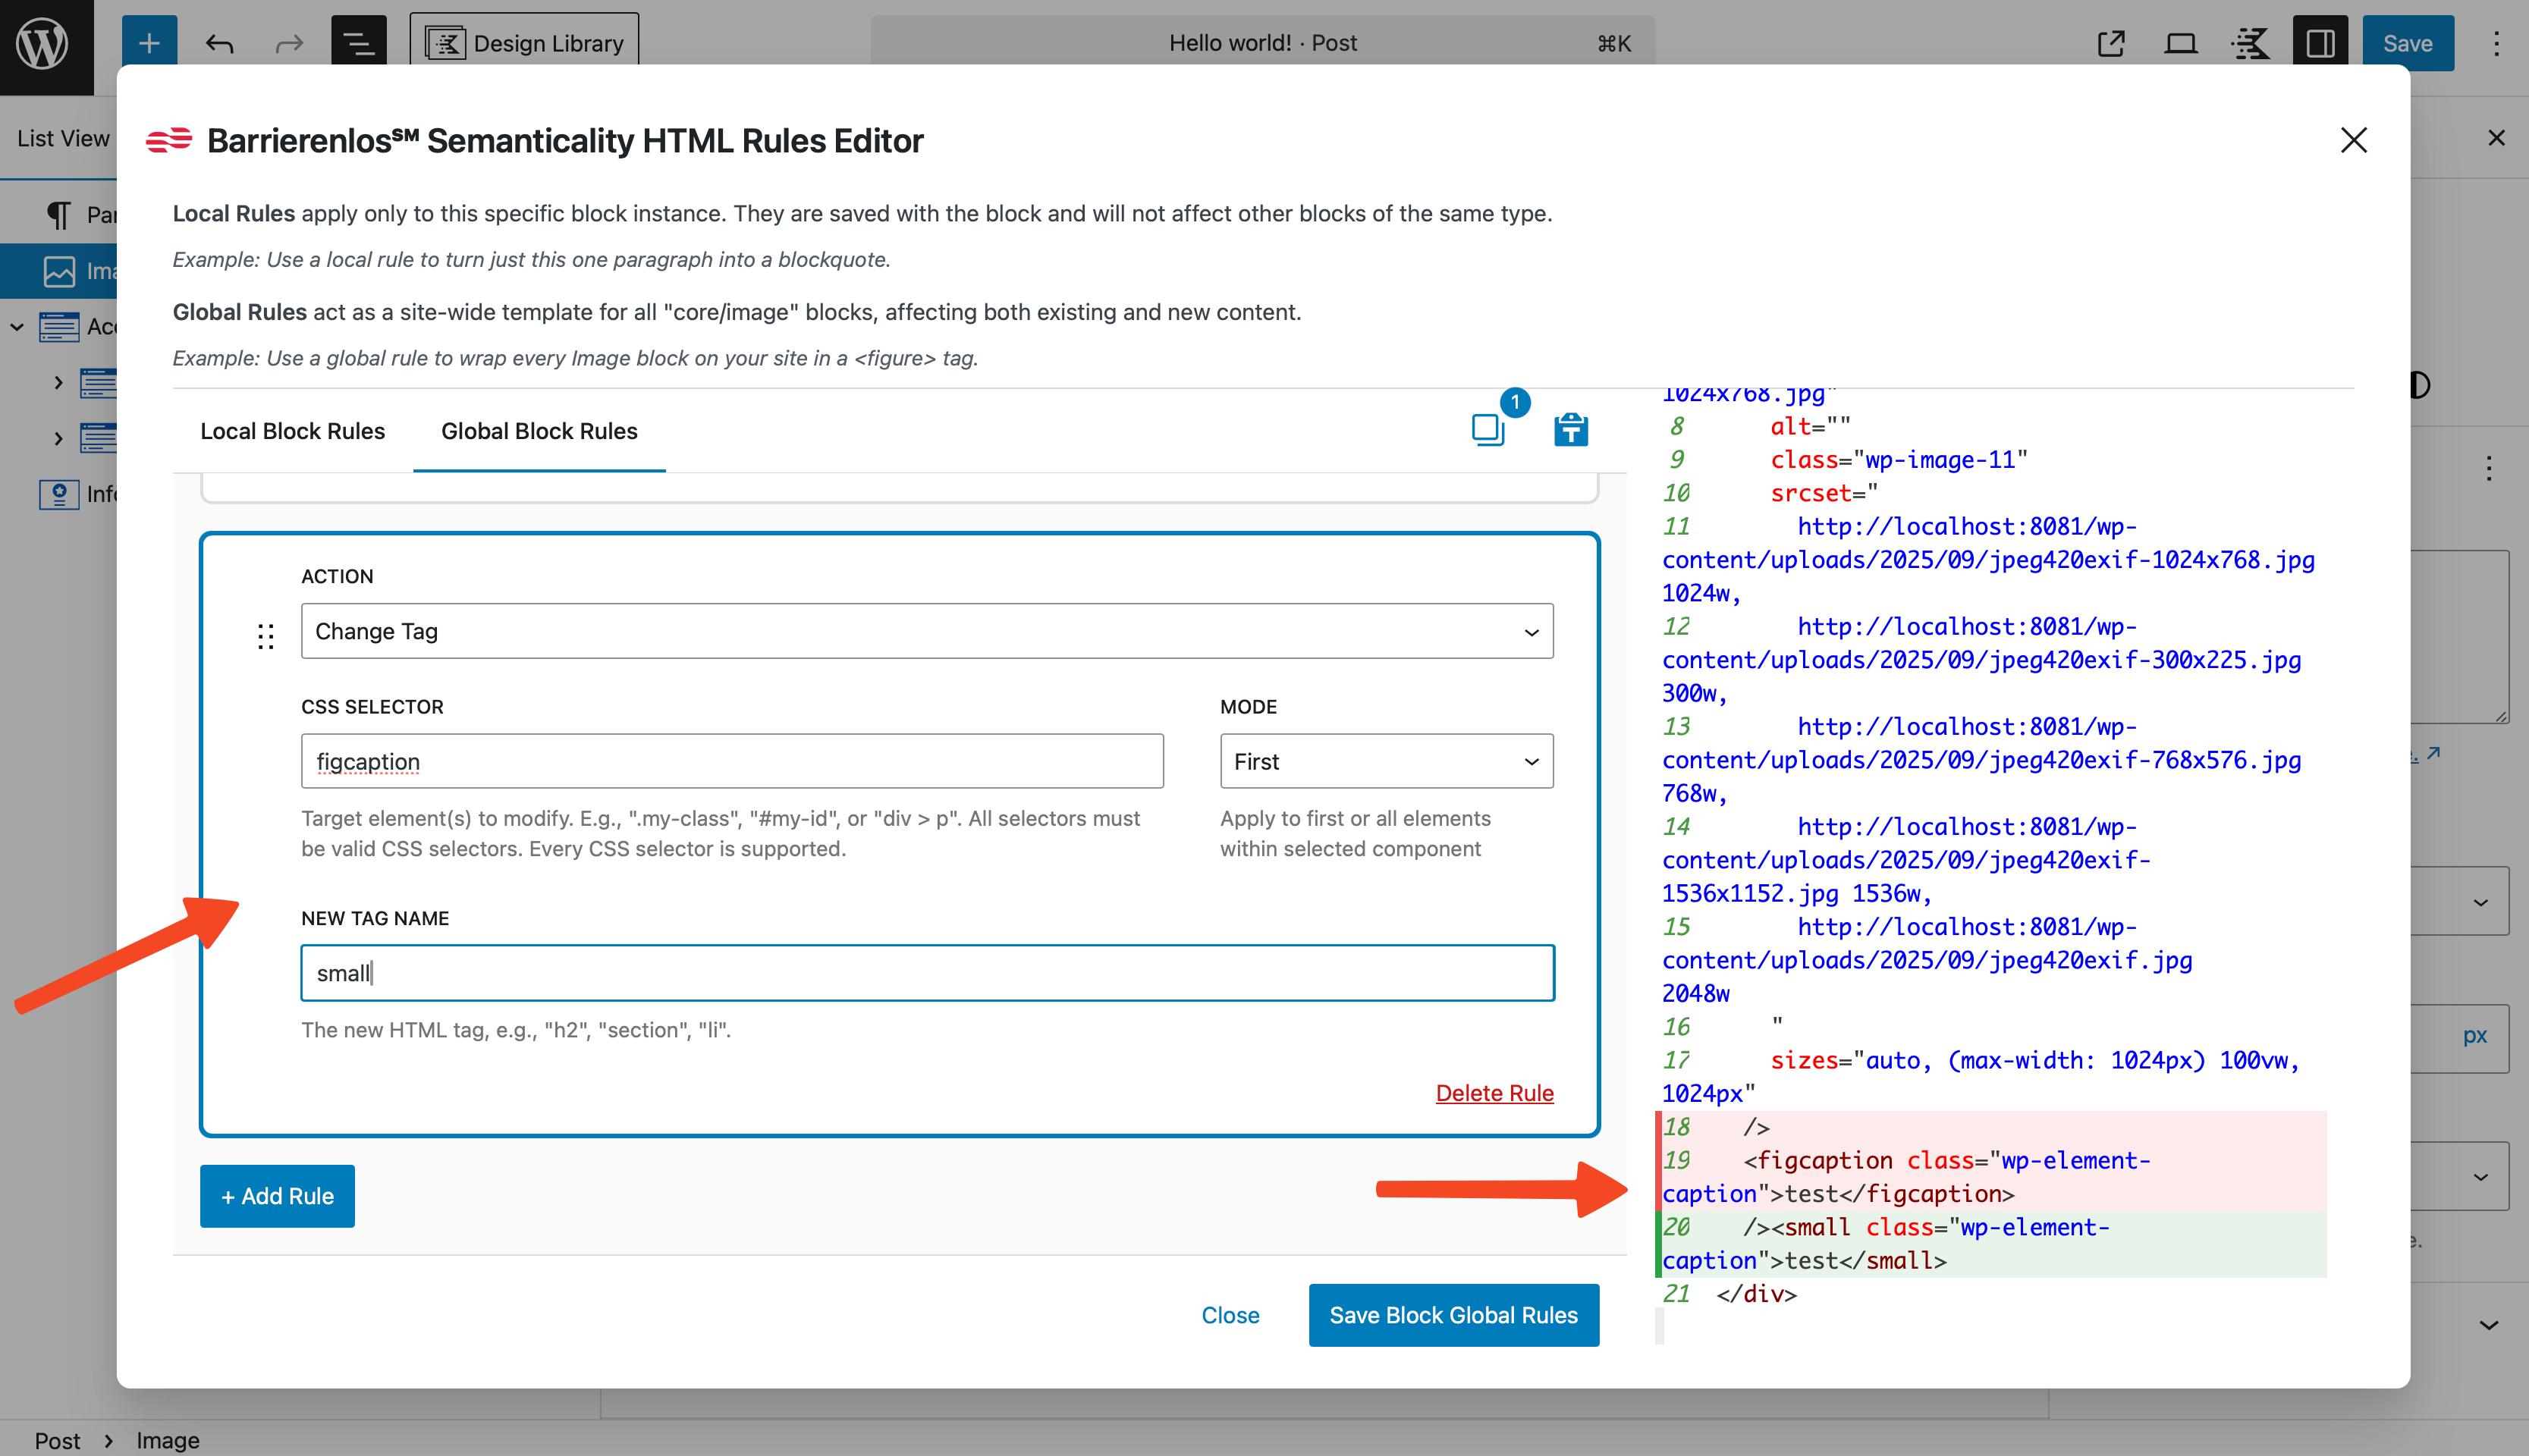
- Create a rule with Action "Modify Attribute"
- Selector:
small - Attr:
id - Insertion: Add / Replace
- Value:
{id_figure_caption}
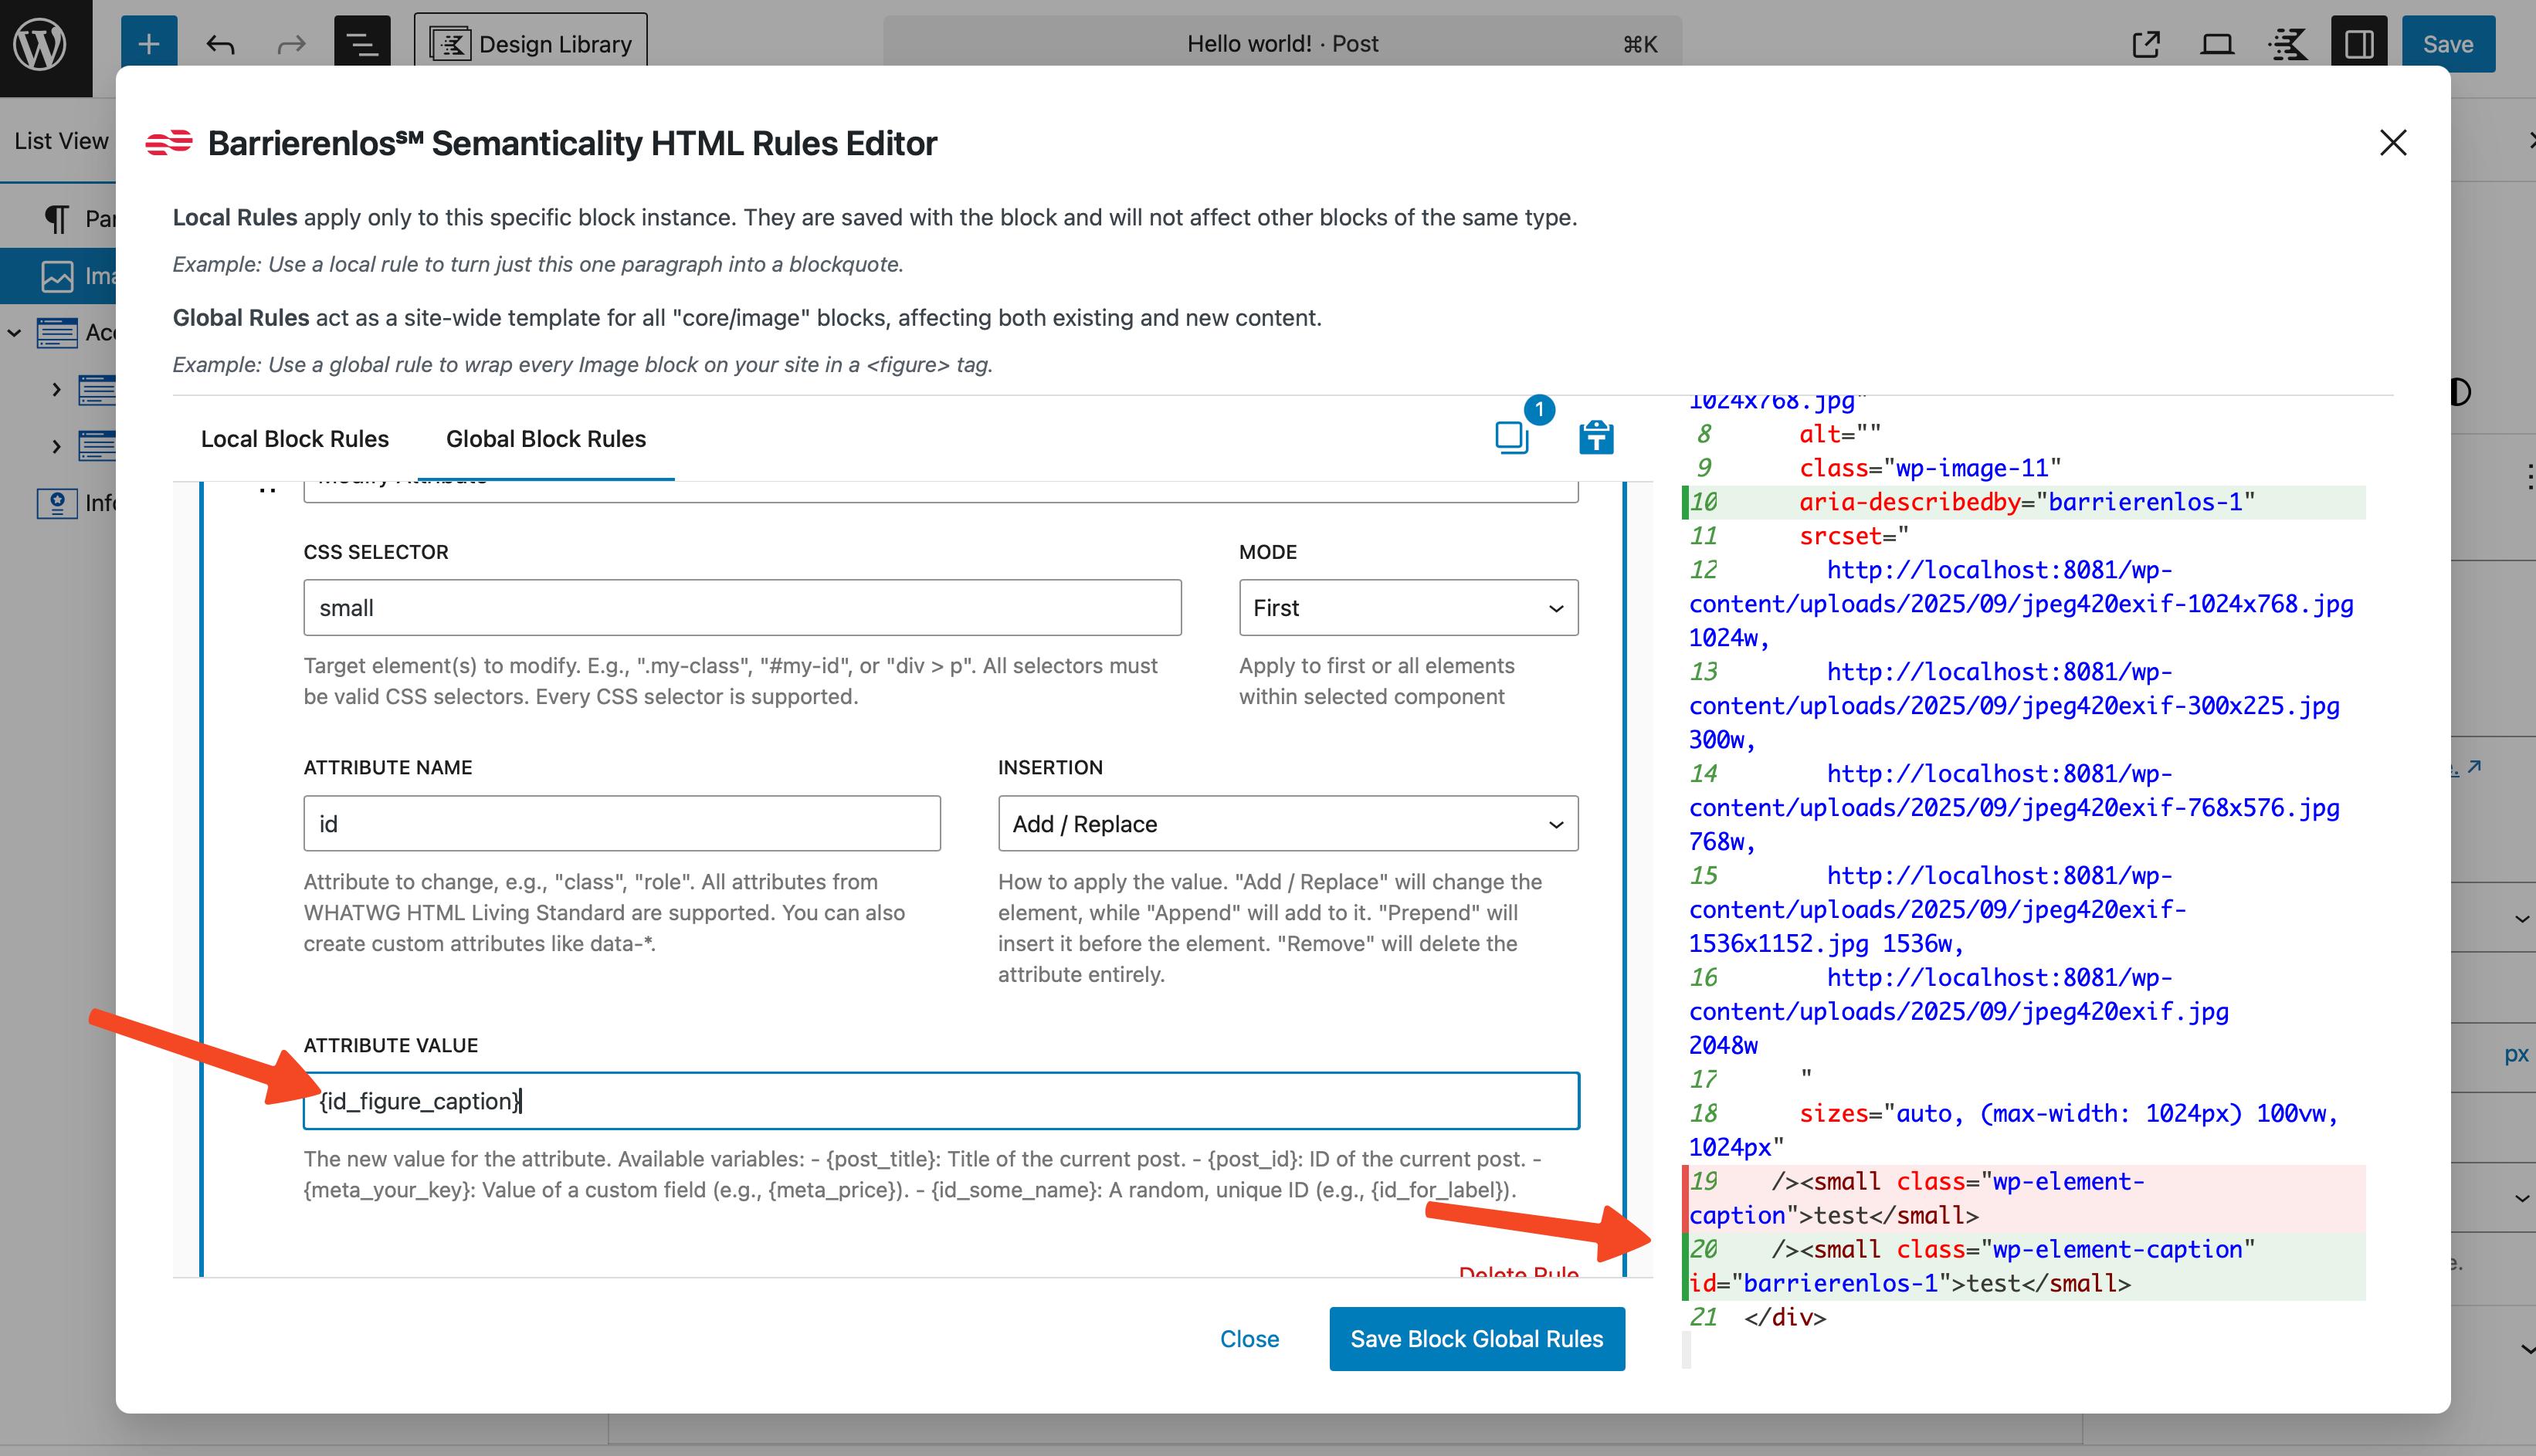
Add an id attribute to the caption to make it linkable to other blocks.
- Create a rule with Action "Modify Attribute"
- Selector:
img - Attr:
aria-describedby - Insertion: Add / Replace
- Value:
{id_figure_caption}
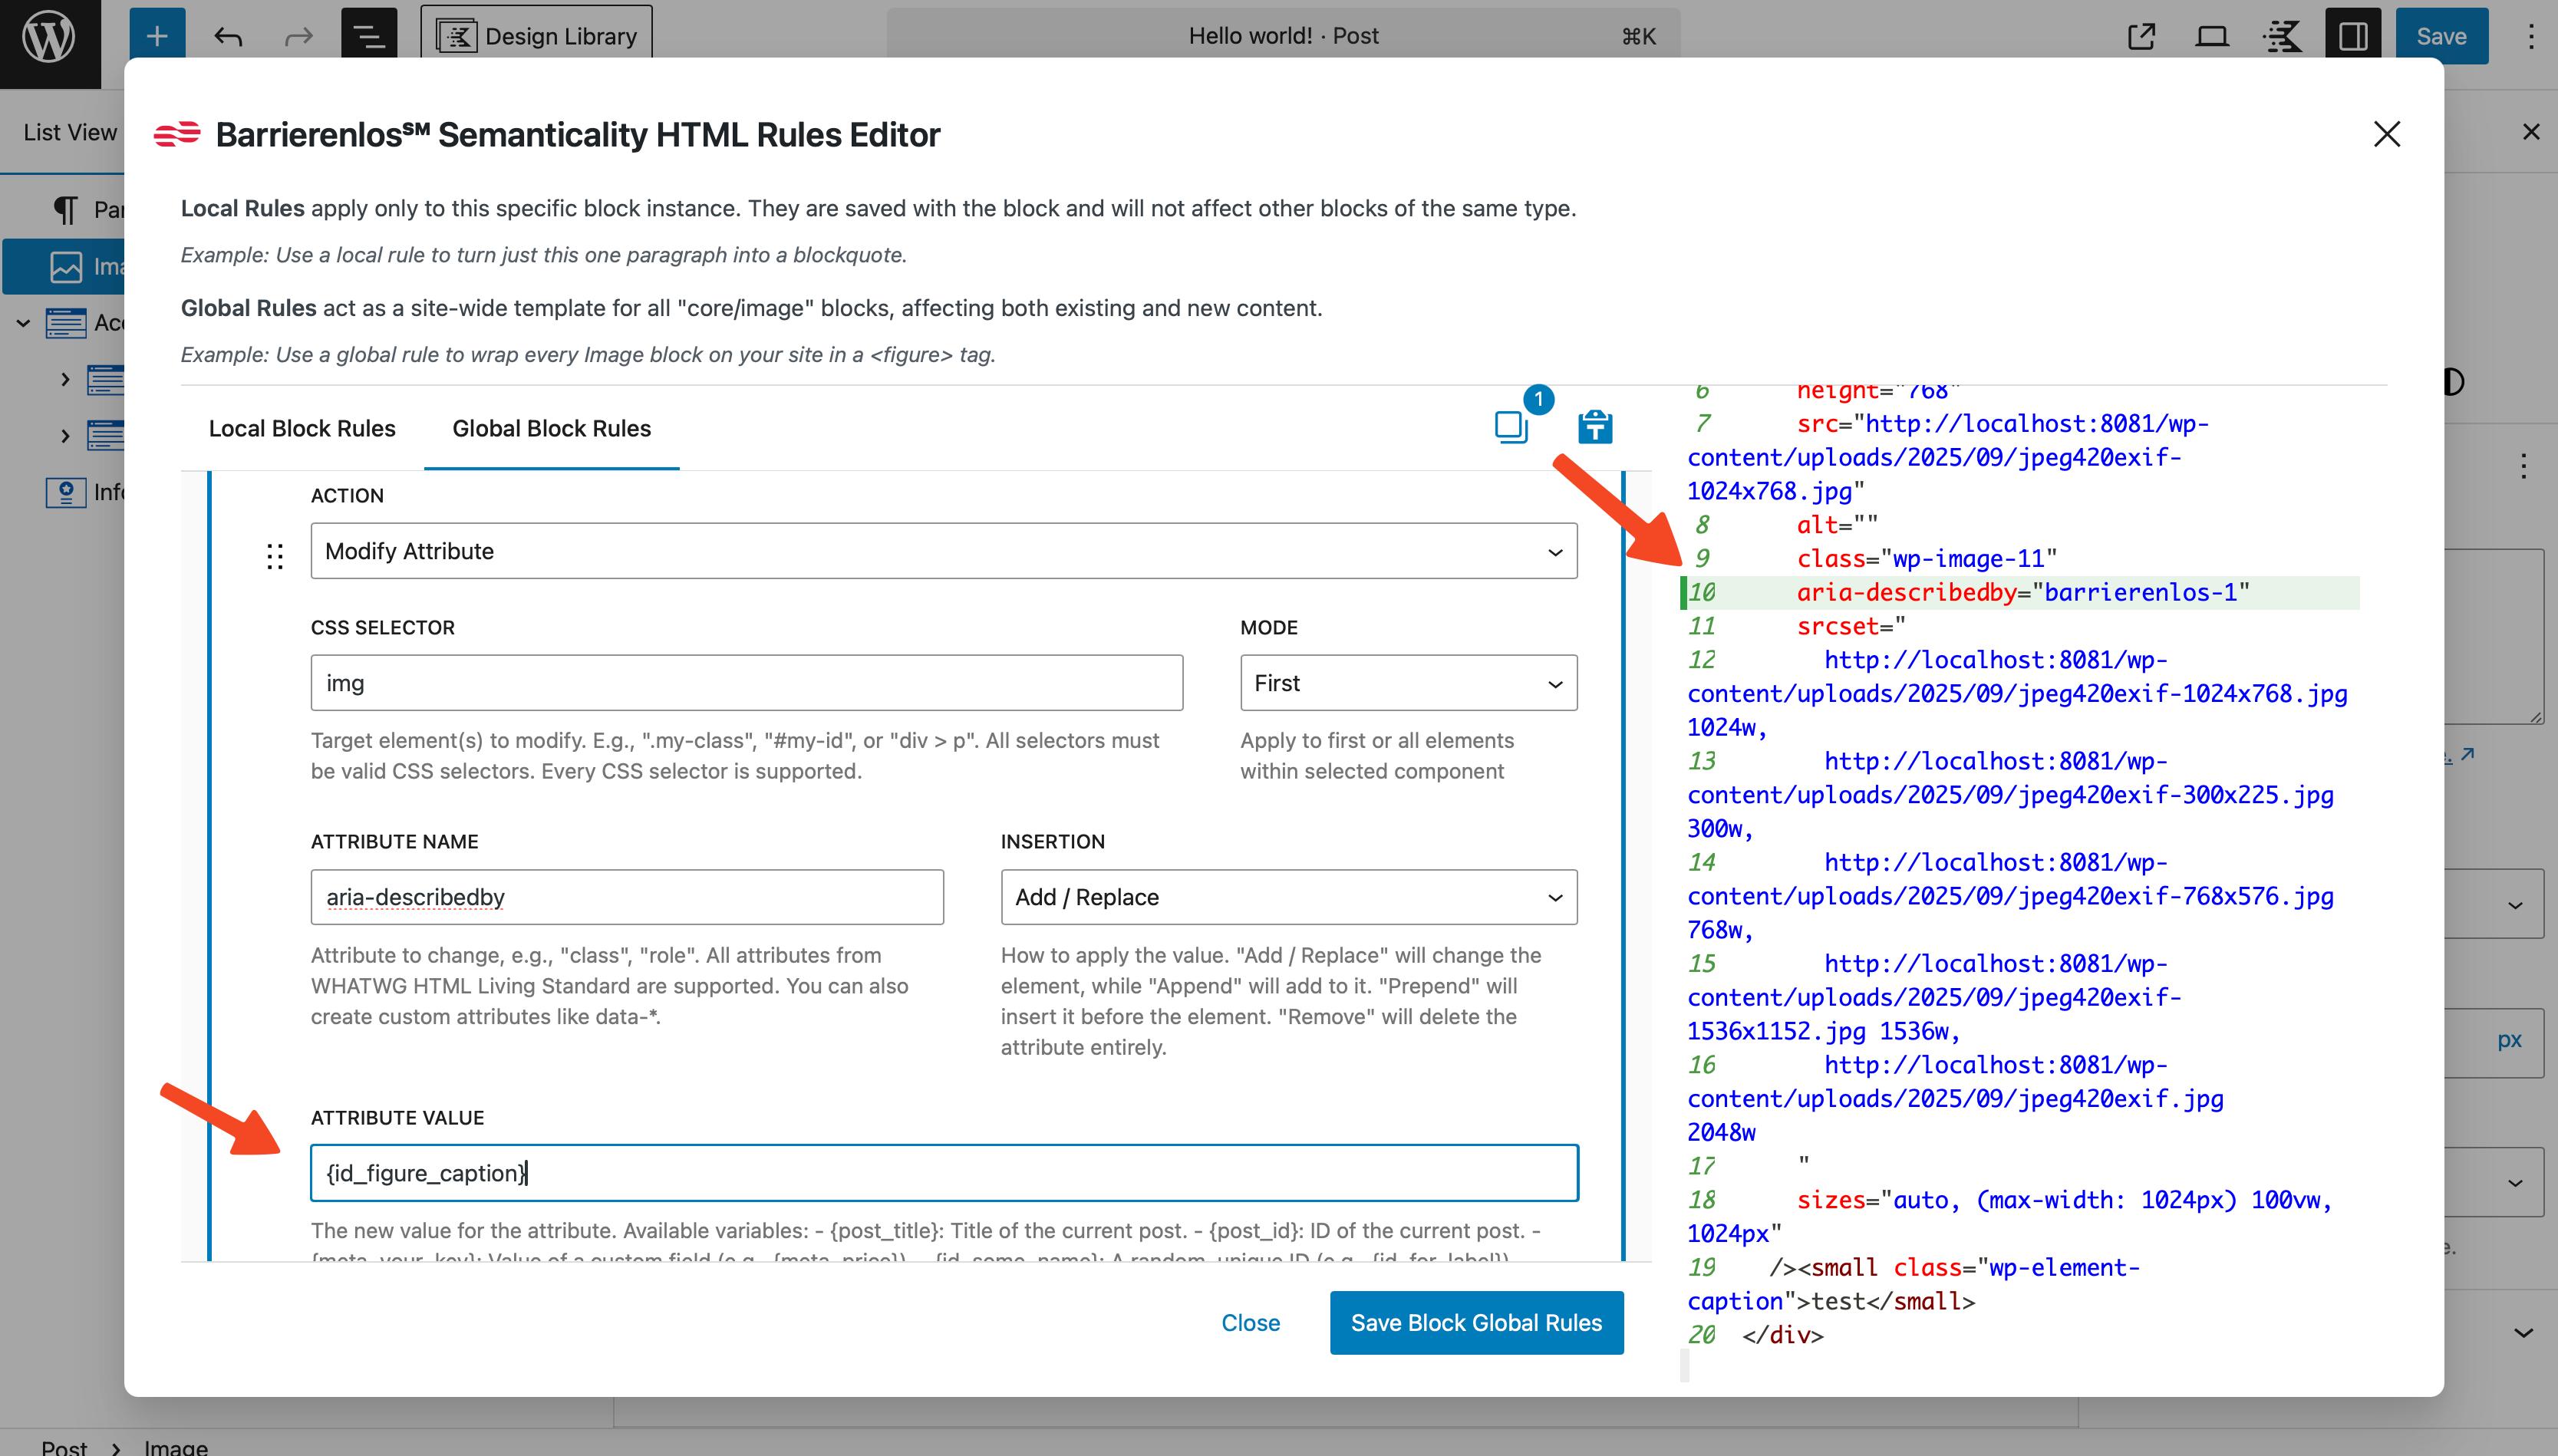
Using this rule, we add the aria-describedby attribute to the image to link it with its caption. This improves accessibility, as screen readers will be able to read the caption along with the image.
Automatic IDs and Relationships for "Read More" Buttons
For cards:
- Modify Attribute
- Selector:
.card-title - Attr:
id - Value:
{id_card_title}
- Modify Attribute
- Selector:
.card-readmore - Attr:
aria-labelledby - Value:
{id_card_title}
Microdata for Quotes
Block: core/quote
- Modify Attribute
- Selector:
blockquote - Attr:
itemtype - Value:
https://schema.org/Quotation
- Modify Attribute
- Selector:
blockquote - Attr:
itemscope - Value: `` (leave empty – the presence of the attribute already enables scope)
Conclusion
In this guide, we explored how to use the Semanticality™ editor to create and edit content transformation rules within Kadence blocks. We discussed core concepts such as selectors, actions, and attributes, and provided examples of using variables and pre-built templates.
You can now apply this knowledge to improve the accessibility and semantics of your content, as well as to optimize your workflow with blocks in the Gutenberg editor.
If you have additional questions or need assistance, please do not hesitate to contact us via the support email, provided you hold the appropriate license.
Sincerely,
The Semanticality™ Support Team
semanticality@barrierenlos.com
FAQ - Frequently Asked Questions
What happens if I add too many rules?
The editor will start to slow down, as each rule rerenders the preview. However, a truly large number of rules would be required for noticeable slowdown.
From the perspective of the final render for the client, the number of rules increases the server load, as the server not only processes content but also applies all rules to each element during site rendering. However, this should not cause issues if the server is sufficiently powerful.
Can a global rule be overridden by a local rule?
Yes. Local rules always take precedence over global ones if the action, selector, and attribute match.
What does "the last rule wins" mean?
Rules are applied from top to bottom. If multiple rules affect the same attribute, the final result is determined by the lowest rule in the list.
What happens to local rules if I close the window without saving the post?
Local rules will be lost, as they are only saved along with the post.
What happens to global rules if I close the window without saving the post?
Global rules are immediately saved in the site options and take effect without saving the post.
Can I transfer rules to another site or post?
Yes. Copy the post code in "Code Editor" mode and paste it into another post. All local rules will be transferred automatically.
How does the preview work in parent blocks?
The parent displays child elements with their local rules already applied. In the parent block, you can override these changes – and they will take precedence.
How do I work with selection and keyboard shortcuts?
You can select multiple rules, copy them (Ctrl+C), paste them (Ctrl+V), or delete them (Delete). Multiple selection is supported (via Shift or Ctrl/Cmd).
What happens after saving rules?
Live Preview rebuilds and shows changes relative to the new block state. This might appear as a "staged" update – which is normal.
Is there a mobile version of the editor?
Not yet, but it is planned for development.
Can I generate rules via ChatGPT?
Yes. Describe the rules in JSON format, and the chat can prepare a ready-made block. This feature will later be integrated into the plugin itself.
About the author